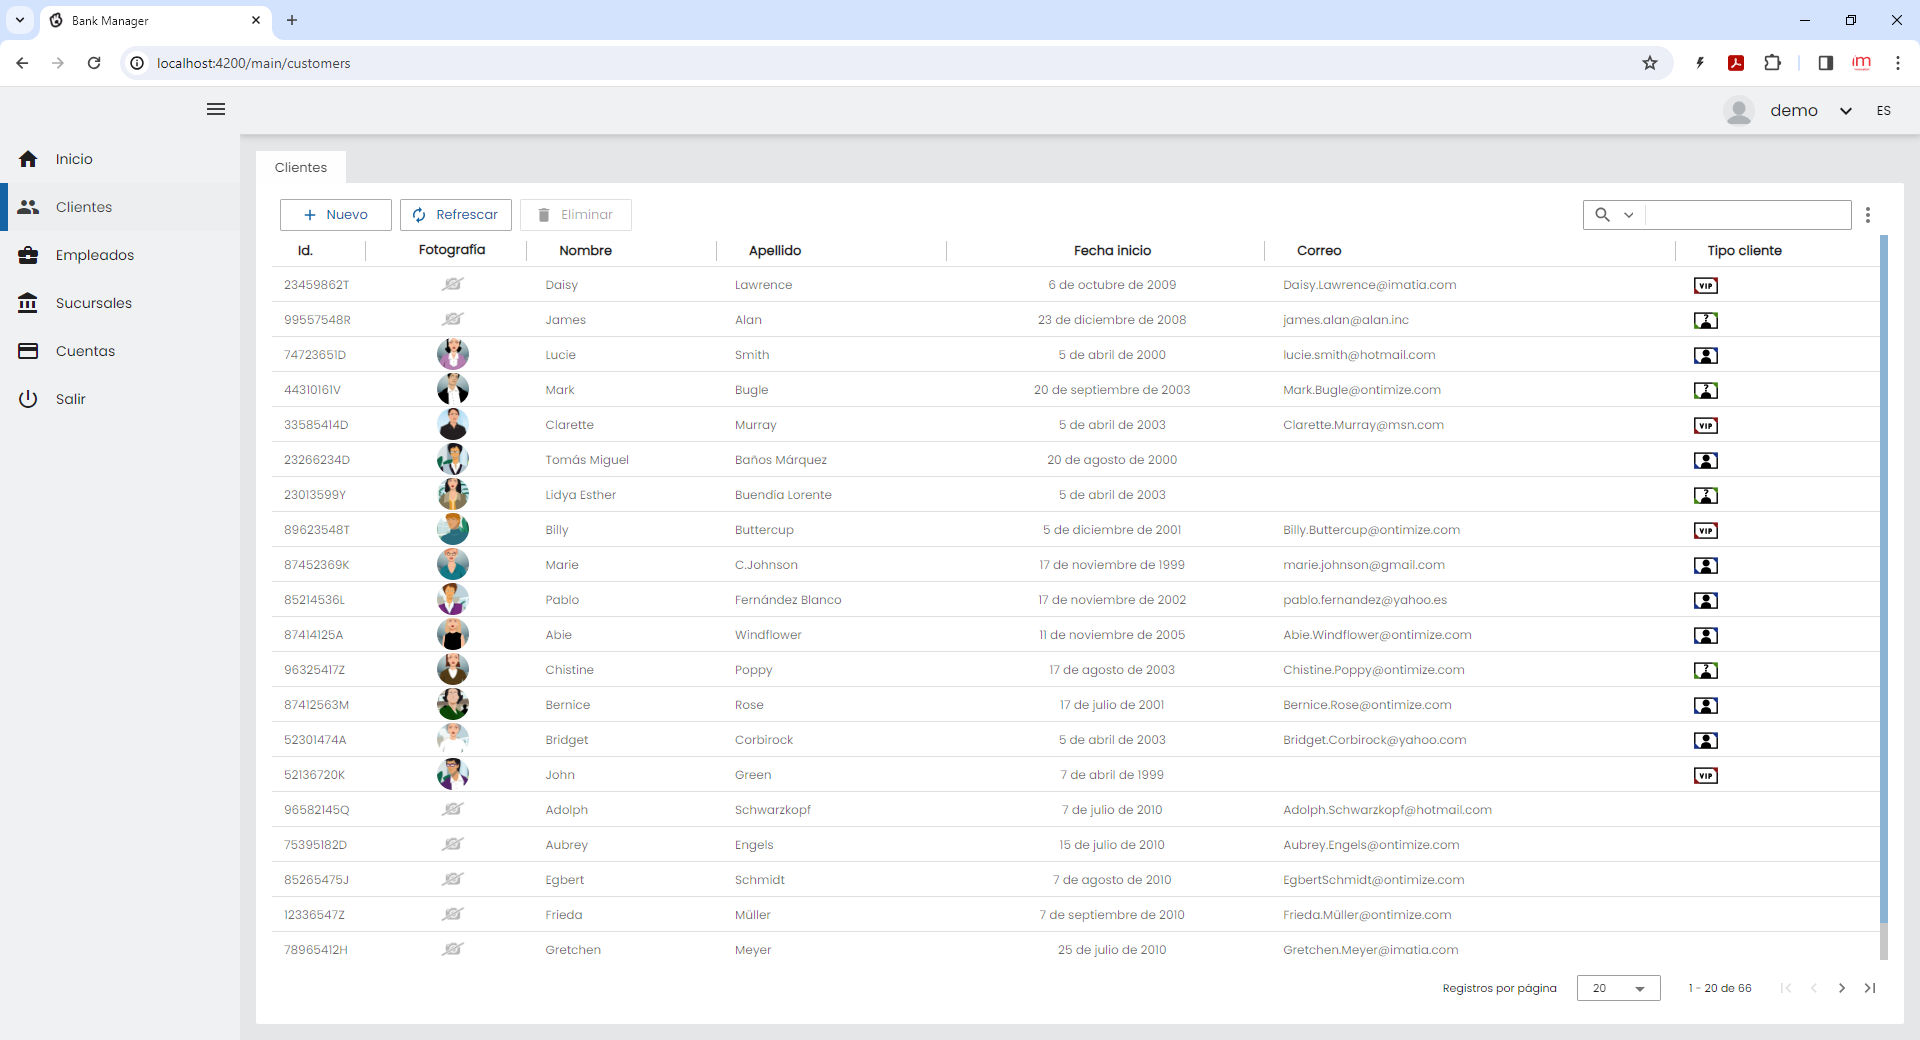
Añadir un render personalizado a una columna
Introducción
En este ejemplo añadiremos un render con una imagen a una columna y otro render con un símbolo y color de fuente diferentes según el valor que tenga la celda de cada una de las tablas.
Render con una imagen personalizada
Para este ejemplo, mostraremos imágenes diferentes en el listado de clientes según su tipo (Normal, VIP u Otro). Modificaremos el listado que ya tenemos y añadiremos los nuevos elementos y clases necesarias
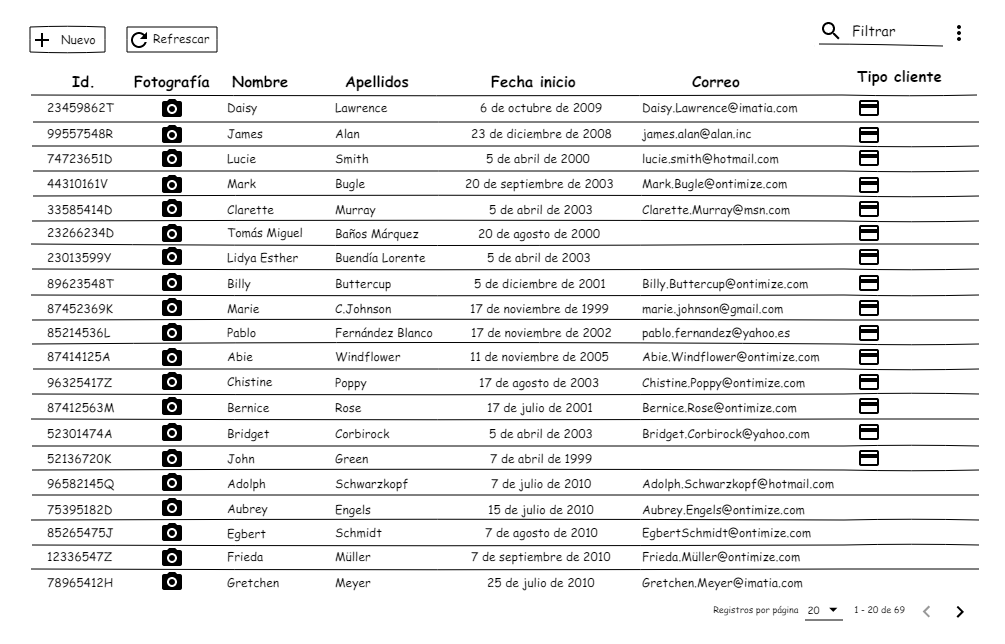
El primer paso es ubicarnos dentro de la ruta src/app/main/customers/customers-home y ejecutar el siguiente comando
npx ng g component --skip-import --skip-tests customertype-column-rendererEsto creará el nuevo componente que usaremos para realizar el nuevo render. Como nuestra idea es poder usar este render en múltiples lugares de la aplicación, aunque su ubicación física esté en esta ruta, el módulo que tendrá la declaración y exportación del componente es el módulo shared
shared.module.ts
import { CommonModule } from '@angular/common';
import { NgModule } from '@angular/core';
import { OntimizeWebModule } from 'ontimize-web-ngx';
import { AccountNumberRenderComponent } from '../main/accounts/accounts-home/account-number-render/account-number-render.component';
import { CustomertypeColumnRendererComponent } from '../main/customers/customers-home/customertype-column-renderer/customertype-column-renderer.component';

export function intRateMonthlyFunction(rowData: Array<any>): number {
  return rowData["INTERESRATE"] / 12;
}

@NgModule({
  imports: [
    OntimizeWebModule
  ],
  declarations: [
    AccountNumberRenderComponent,
    CustomertypeColumnRendererComponent
  ],
  exports: [
    CommonModule,
    AccountNumberRenderComponent,
    CustomertypeColumnRendererComponent
  ]
})
export class SharedModule { }
Ahora, el propio modulo de customers debe importar el módulo de shared (que ya lo importa de ejercicios anteriores)
customers.module.ts
import { NgModule } from '@angular/core';
import { CommonModule } from '@angular/common';
import { OntimizeWebModule } from 'ontimize-web-ngx';
import { CustomersRoutingModule } from './customers-routing.module';
import { CustomersHomeComponent } from './customers-home/customers-home.component';
import { CustomersDetailComponent } from './customers-detail/customers-detail.component';
import { CustomersNewComponent } from './customers-new/customers-new.component';
import { SharedModule } from 'src/app/shared/shared.module';


@NgModule({
  declarations: [
    CustomersHomeComponent,
    CustomersDetailComponent,
    CustomersNewComponent
  ],
  imports: [
    CommonModule,
    SharedModule,
    OntimizeWebModule,
    CustomersRoutingModule
  ]
})
export class CustomersModule { }
En nuestro fichero customertype-column-renderer.html, crearemos la platilla que se mostrará. En dicha plantilla, utilizaremos las directrices *ngIfg de Angular para seleccionar que imagen que queremos mostrar a través de la variable cellvalue
customertype-column-renderer.html
<ng-template #templateref let-cellvalue="cellvalue" let-rowvalue="rowvalue">
    <img *ngIf="cellvalue == 1" src="assets/images/normal_24.png" width="24" height="24">
    <img *ngIf="cellvalue == 2" src="assets/images/vip_24.png" width="24" height="24">
    <img *ngIf="cellvalue == 3" src="assets/images/other_24.png" width="24" height="24">
</ng-template>
En el fichero customertype-column-renderer.ts, extenderemos la clase OBaseTableCellRenderer, incluyendo la anotacion @ViewChild y el injector en el constructor
customertype-column-renderer.ts
import { Component, Injector, TemplateRef, ViewChild } from '@angular/core';
import { OBaseTableCellRenderer } from 'ontimize-web-ngx';

@Component({
  selector: 'app-customertype-column-renderer',
  templateUrl: './customertype-column-renderer.component.html',
  styleUrls: ['./customertype-column-renderer.component.css']
})
export class CustomertypeColumnRendererComponent extends OBaseTableCellRenderer {

  @ViewChild('templateref', { read: TemplateRef, static: false }) public templateref: TemplateRef<any>;

  constructor(protected injector: Injector) {
    super(injector);
  }

  ngOnInit() {
  }
}
Para utilizar este render, lo declaramos dentro de la columna de CUSTOMERTYPEID
customers-home.component.html
<o-form-layout-manager attr="customersHome" title="{{'CUSTOMERS' | oTranslate }}" separator=" "
    mode="tab" label-columns="NAME;SURNAME">
    <o-table attr="customersTable" service="customers" entity="customer" keys="CUSTOMERID"
        columns="CUSTOMERID;ID;PHOTO;NAME;SURNAME;STARTDATE;EMAIL;CUSTOMERTYPEID"
        visible-columns="ID;PHOTO;NAME;SURNAME;STARTDATE;EMAIL;CUSTOMERTYPEID" query-rows="20">
        <o-table-column attr="PHOTO" title="PHOTO" orderable="no" searchable="no" type="image" avatar="yes"
            empty-image="assets/images/no-image.png" image-type="base64"></o-table-column>
        <o-table-column attr="STARTDATE" title="STARTDATE" type="date" format="LL"></o-table-column>
        <o-table-column attr="ID" title="ID" width="100px"></o-table-column>
        <o-table-column attr="CUSTOMERTYPEID" title="CUSTOMERTYPEID">
            <app-customertype-column-renderer></app-customertype-column-renderer>
        </o-table-column>
    </o-table>
</o-form-layout-manager>
Las imágenes tienen que estar dentro de la carpeta src/assets/images
 normal_24.png normal_24.png |
 vip_24.png vip_24.png |
 other_24.png other_24.png |
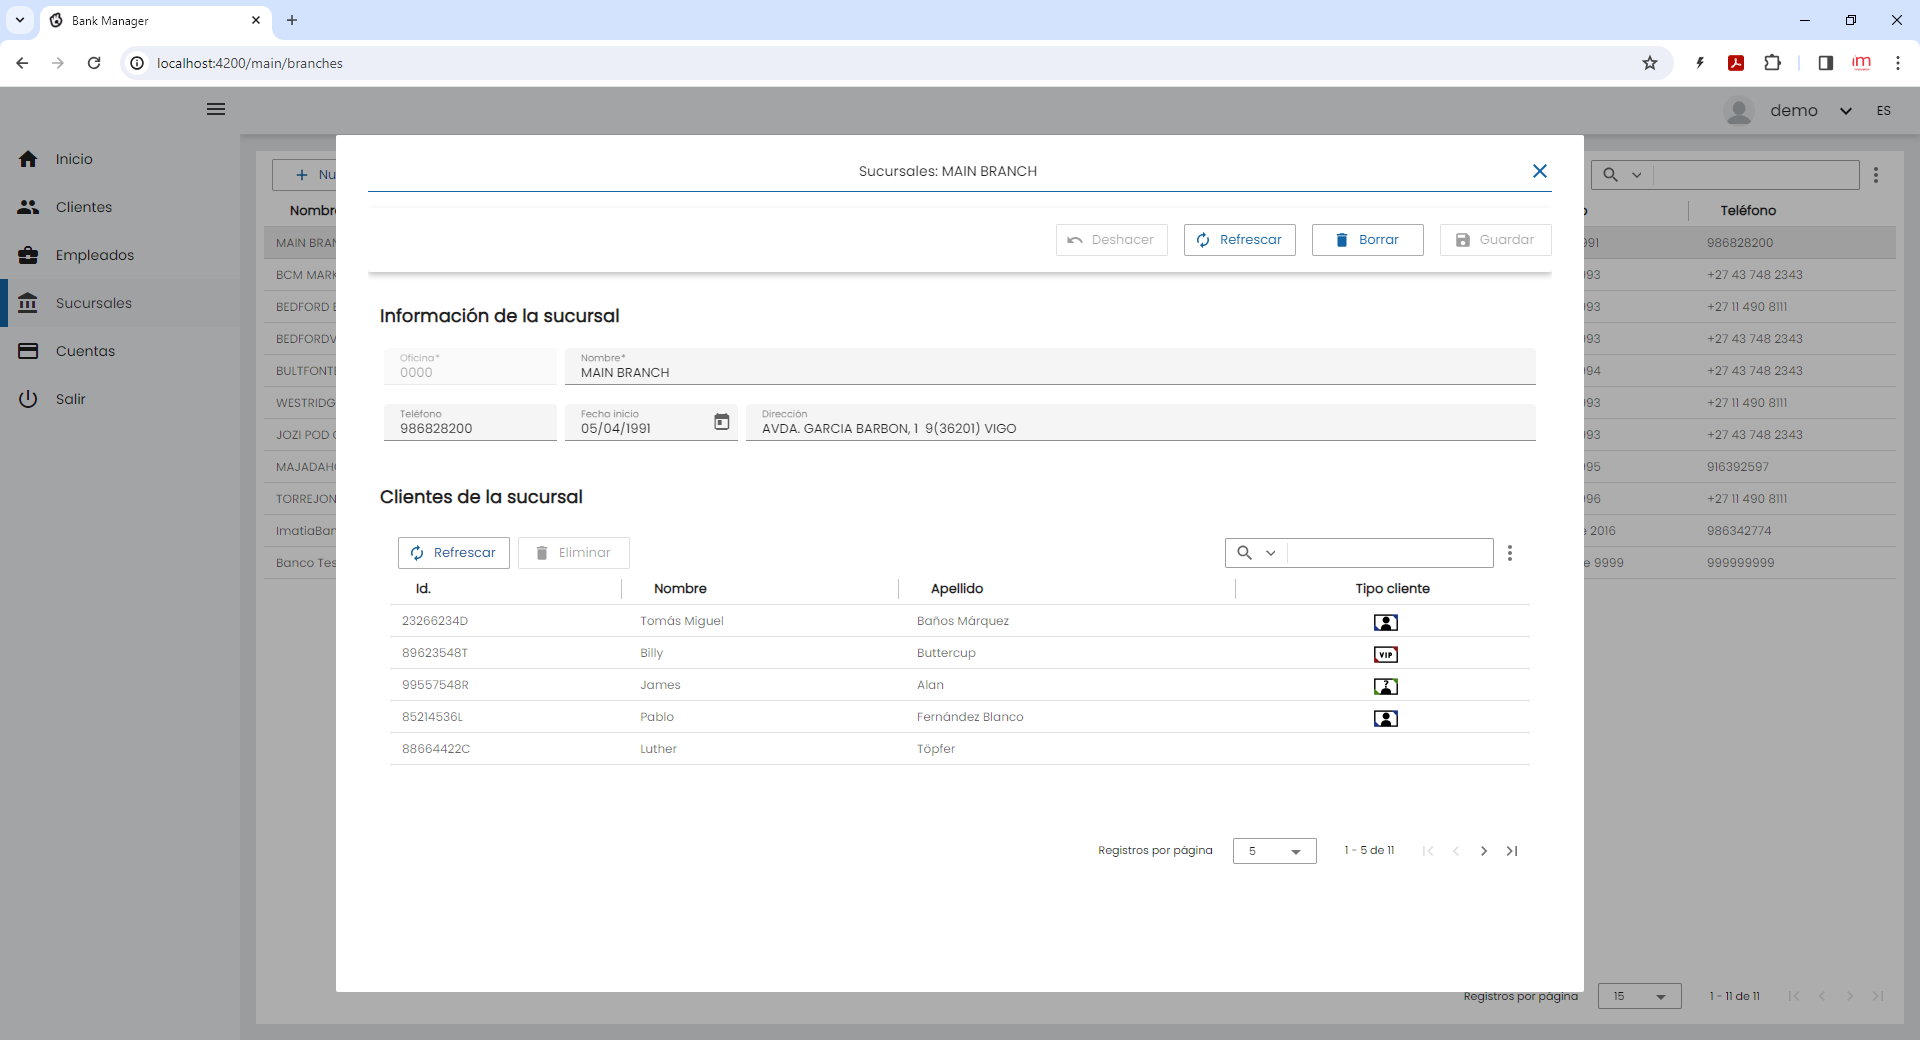
En el formulario de detalle de las cuentas, también existe un listado de clientes, por lo que añadiremos al módulo de branches la importación del módulo shared, y se modificará el formulario del detalle de las suscursales para actualizar el listado de cliente con el render que hemos creado
branches.module.ts
import { NgModule } from '@angular/core';
import { CommonModule } from '@angular/common';
import { OntimizeWebModule } from 'ontimize-web-ngx';
import { BranchesRoutingModule } from './branches-routing.module';
import { BranchesHomeComponent } from './branches-home/branches-home.component';
import { BranchesDetailComponent } from './branches-detail/branches-detail.component';
import { BranchesNewComponent } from './branches-new/branches-new.component';
import { SharedModule } from 'src/app/shared/shared.module';


@NgModule({
  declarations: [
    BranchesHomeComponent,
    BranchesDetailComponent,
    BranchesNewComponent
  ],
  imports: [
    CommonModule,
    SharedModule,
    OntimizeWebModule,
    BranchesRoutingModule
  ]
})
export class BranchesModule { }
branches-detail.component.html
<o-form service="branches" entity="branch" keys="OFFICEID" header-actions="R;U;D" show-header-navigation="no">
    <o-column title="{{ 'BRANCH_INFORMATION' | oTranslate }}">
        <div fxLayout="row" fxLayoutGap="8px">
            <o-text-input fxFlex="15" attr="OFFICEID" sql-type="STRING" enabled="no" required="yes"></o-text-input>
            <o-text-input fxFlex="85" attr="NAME" required="yes"></o-text-input>
        </div>
        <div fxLayout="row" fxLayoutGap="8px">
            <o-text-input fxFlex="15" attr="PHONE" step="0" grouping="no"></o-text-input>
            <o-date-input fxFlex="15" attr="STARTDATE"></o-date-input>
            <o-text-input fxFlex="70" attr="ADDRESS"></o-text-input>
        </div>
    </o-column>
    <o-row title="{{ 'CUSTOMERS_INFORMATION' | oTranslate }}">
        <o-table fxFlex attr="customerAccountTable" service="customers" entity="vCustomerAccount" parent-keys="OFFICEID"
            columns="ID;NAME;SURNAME;CUSTOMERID;CUSTOMERTYPEID" visible-columns="ID;NAME;SURNAME;CUSTOMERTYPEID"
            insert-button="no" keys="CUSTOMERID" query-rows="5">
            <o-table-column attr="ID" title="ID"></o-table-column>
            <o-table-column attr="NAME" title="NAME"></o-table-column>
            <o-table-column attr="SURNAME" title="SURNAME"></o-table-column>
            <o-table-column attr="CUSTOMERTYPEID" title="CUSTOMERTYPEID" content-align="center">
                <app-customertype-column-renderer></app-customertype-column-renderer>
            </o-table-column>
        </o-table>
    </o-row>
</o-form>- ontimize-web-tutorial
- e2e
- src
- app.e2e-spec.ts
- app.po.ts
- protractor.conf.js
- tsconfig.json
- src
- src
- app
- login
- login-routing.module.ts
- login.component.html
- login.component.scss
- login.component.ts
- login.module.ts
- login.theme.scss
- main
- accounts
- accounts-detail
- accounts-detail.component.css
- accounts-detail.component.html
- accounts-detail.component.ts
- accounts-home
- account-number-render
- account-number-render.component.css
- account-number-render.component.html
- account-number-render.component.ts
- accounts-home.component.css
- accounts-home.component.html
- accounts-home.component.ts
- account-number-render
- accounts-new
- accounts-new.component.css
- accounts-new.component.html
- accounts-new.component.ts
- add-customer
- add-customer.component.css
- add-customer.component.html
- add-customer.component.ts
- add-movement
- add-movement.component.css
- add-movement.component.html
- add-movement.component.ts
- accounts-routing.module.ts
- accounts.module.ts
- accounts-detail
- branches
- branches-detail
- branches-detail.component.css
- branches-detail.component.html
- branches-detail.component.ts
- branches-home
- branches-home.component.css
- branches-home.component.html
- branches-home.component.ts
- branches-new
- branches-new.component.css
- branches-new.component.html
- branches-new.component.ts
- branches-routing.module.ts
- branches.module.ts
- branches-detail
- customers
- customers-detail
- customers-detail.component.css
- customers-detail.component.html
- customers-detail.component.ts
- customers-home
- customertype-column-renderer
- customertype-column-renderer.component.css
- customertype-column-renderer.component.html
- customertype-column-renderer.component.ts
- customers-home.component.css
- customers-home.component.html
- customers-home.component.ts
- customertype-column-renderer
- customers-new
- customers-new.component.css
- customers-new.component.html
- customers-new.component.ts
- customers-routing.module.ts
- customers.module.ts
- customers-detail
- employees
- employees-detail
- employees-detail.component.css
- employees-detail.component.html
- employees-detail.component.ts
- employees-home
- employees-home.component.css
- employees-home.component.html
- employees-home.component.ts
- employees-routing.module.ts
- employees.module.ts
- employees-detail
- home
- home-routing.module.ts
- home.component.html
- home.component.scss
- home.component.ts
- home.module.ts
- main-routing.module.ts
- main.component.html
- main.component.scss
- main.component.ts
- main.module.ts
- accounts
- shared
- app.menu.config.ts
- app.services.config.ts
- shared.module.ts
- app-routing.module.ts
- app.component.html
- app.component.scss
- app.component.spec.ts
- app.component.ts
- app.config.ts
- app.module.ts
- login
- assets
- css
- app.scss
- loader.css
- i18n
- en.json
- es.json
- icons
- ontimize128.png
- ontimize16.png
- ontimize256.png
- ontimize32.png
- ontimize48.png
- ontimize64.png
- ontimize72.png
- ontimize96.png
- images
- login_bg.png
- no-image.png
- normal_24.png
- ontimize.png
- ontimize_web_log.png
- other_24.png
- sidenav-closed.png
- sidenav-opened.png
- user_profile.png
- vip_24.png
- js
- domchange.js
- keyboard.js
- .gitkeep
- css
- environments
- environment.prod.ts
- environment.ts
- favicon.ico
- index.html
- main.ts
- manifest.webmanifest
- polyfills.ts
- styles.scss
- test.ts
- app
- .browserslistrc
- .editorconfig
- .eslintrc.json
- .gitignore
- angular.json
- karma.conf.js
- ngsw-config.json
- package-lock.json
- package.json
- README.md
- tsconfig.app.json
- tsconfig.json
- tsconfig.spec.json
- e2e
Render con símbolos y colores personalizados
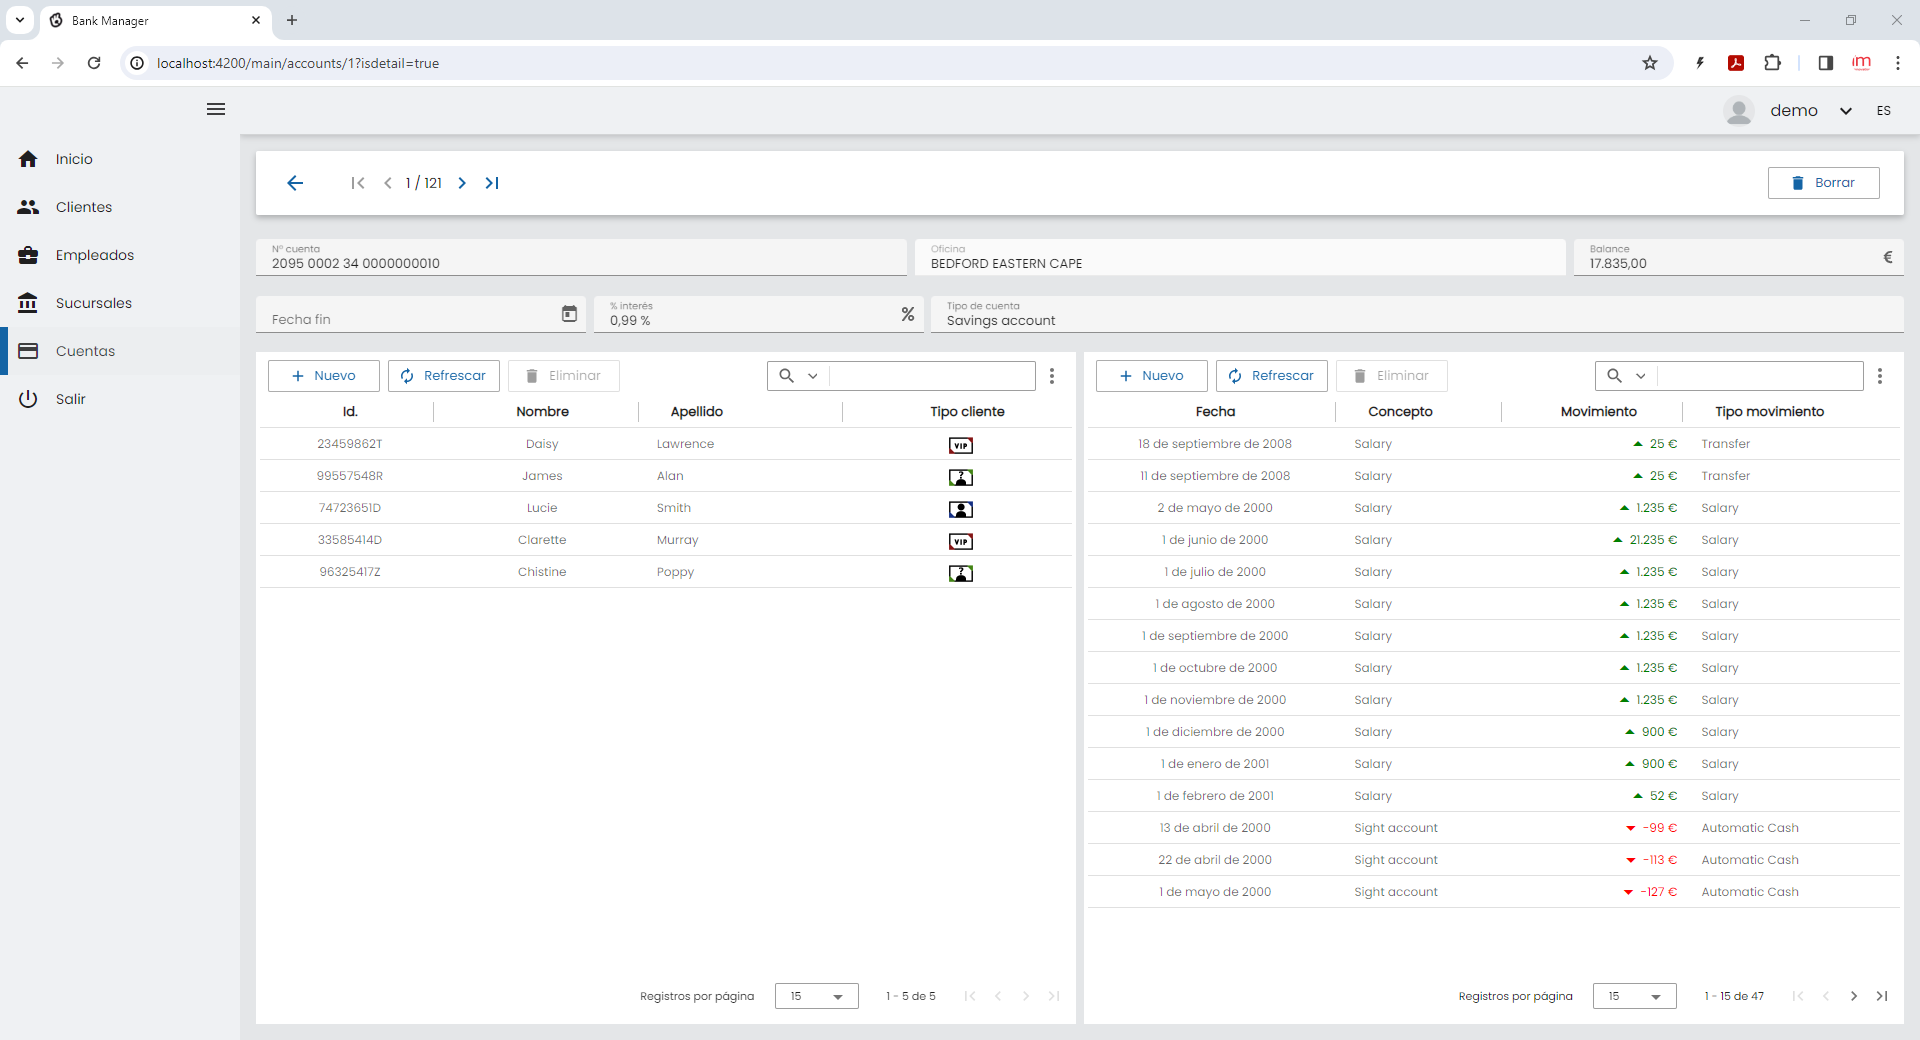
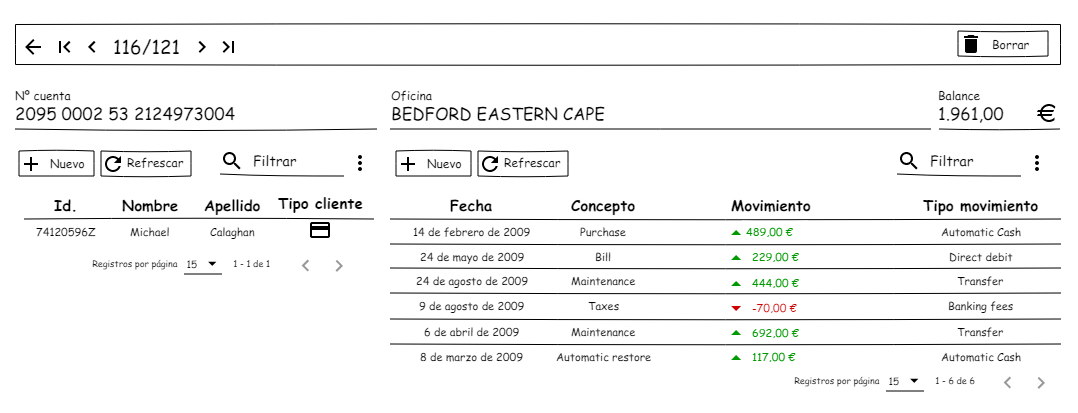
En este ejemplo añadiremos un render a la columna de movimientos dentro del detalle de las cuentas, que según su valor se modifique el color y se añadan símbolos y además añadiremos el render que hemos creado para el tipo de cliente.
Nos ubicamos dentro de la carpeta que contiene el detalle de las cuentas, src/app/main/accounts/accounts-detail y ejecutamos el siguiente comando:
npx ng g component --skip-import --skip-tests movement-column-rendererAl ejecutar el comando, crearemos el componente que usaremos como render. De igual forma que el render anterior, este componente estará declarado y exportado en el módulo shared
shared.module.ts
import { CommonModule } from '@angular/common';
import { NgModule } from '@angular/core';
import { OntimizeWebModule } from 'ontimize-web-ngx';
import { AccountNumberRenderComponent } from '../main/accounts/accounts-home/account-number-render/account-number-render.component';
import { CustomertypeColumnRendererComponent } from '../main/customers/customers-home/customertype-column-renderer/customertype-column-renderer.component';
import { MovementColumnRendererComponent } from '../main/accounts/accounts-detail/movement-column-renderer/movement-column-renderer.component';

export function intRateMonthlyFunction(rowData: Array<any>): number {
  return rowData["INTERESRATE"] / 12;
}

@NgModule({
  imports: [
    OntimizeWebModule
  ],
  declarations: [
    AccountNumberRenderComponent,
    CustomertypeColumnRendererComponent,
    MovementColumnRendererComponent
  ],
  exports: [
    CommonModule,
    AccountNumberRenderComponent,
    CustomertypeColumnRendererComponent,
    MovementColumnRendererComponent
  ]
})
export class SharedModule { }
Es necesario que el módulo accounts.module.ts importe el módulo shared (importado en ejercicios anteriores)
accounts.module.ts
import { NgModule } from '@angular/core';
import { CommonModule } from '@angular/common';
import { OntimizeWebModule } from 'ontimize-web-ngx';
import { AccountsRoutingModule } from './accounts-routing.module';
import { AccountsHomeComponent } from './accounts-home/accounts-home.component';
import { SharedModule } from 'src/app/shared/shared.module';
import { AccountsDetailComponent } from './accounts-detail/accounts-detail.component';
import { AccountsNewComponent } from './accounts-new/accounts-new.component';
import { AddCustomerComponent } from './add-customer/add-customer.component';
import { AddMovementComponent } from './add-movement/add-movement.component';


@NgModule({
  declarations: [
    AccountsHomeComponent,
    AccountsDetailComponent,
    AccountsNewComponent,
    AddCustomerComponent,
    AddMovementComponent
  ],
  imports: [
    CommonModule,
    SharedModule,
    OntimizeWebModule,
    AccountsRoutingModule
  ]
})
export class AccountsModule { }
El fichero movement-column-renderer.component.html contendrá la plantilla que mostrará la columna de la tabla que contendrá el render. Mediante directivas *ngIf, y calculando el valor numérico de la variable cellvalue, se mostrará el componente <span> correspondiente. Estos componentes <span> contienen un icono (<mat-icon>arrow_drop_down</mat-icon> o <mat-icon>arrow_drop_up</mat-icon>), tomarán un color u otro dependiendo del valor del cellvalue y añadirán un texto depués de pasar el valor cellvalue al método getCellData(value: any) del fichero movement-column-renderer.component.ts
movement-column-renderer.component.html
<ng-template #templateref let-cellvalue="cellvalue" let-rowvalue="rowvalue">
    <span *ngIf="cellvalue < 0" style="color:red;" fxLayoutAlign="end center">
        <mat-icon>arrow_drop_down</mat-icon>{{ getCellData(cellvalue) }}
    </span>
    <span *ngIf="cellvalue >= 0" style="color:green" fxLayoutAlign="end center">
        <mat-icon>arrow_drop_up</mat-icon>{{ getCellData(cellvalue) }}
    </span>
</ng-template>
El el fichero movement-column-renderer.component.ts la clase extenderá de OBaseTableCellRenderer. Esta vez, utilizaremos pipes para transformar el valor. En en constructor, llamaremos al método setComponentPipe() que estará definido en la propia clase, para que indique que el pipe del render es de tipo OCurrencPipe. En el método ngOnInit, se declaran los argumentos que aceptará el pipe, como puede ser el símbolo de la moneda, los separadores de decimales y millares, etc. Dentro del método getCellData(value: any) transformará el valor con los argumentos de los pipe.
movement-column-renderer.component.ts
import { Component, OnInit, Injector, TemplateRef, ViewChild } from '@angular/core';
import { OBaseTableCellRenderer, OCurrencyPipe } from 'ontimize-web-ngx';

@Component({
  selector: 'app-movement-column-renderer',
  templateUrl: './movement-column-renderer.component.html',
  styleUrls: ['./movement-column-renderer.component.css']
})
export class MovementColumnRendererComponent extends OBaseTableCellRenderer implements OnInit {

  @ViewChild('templateref', { read: TemplateRef, static: false }) public templateref: TemplateRef<any>;

  constructor(protected injector: Injector) {
    super(injector);
    this.setComponentPipe();
  }

  setComponentPipe() {
    this.componentPipe = new OCurrencyPipe(this.injector);
  }

  ngOnInit() {
    this.pipeArguments = {
      currencySimbol: '€',
      currencySymbolPosition: 'right',
      decimalDigits: 2,
      decimalSeparator: ',',
      grouping: true,
      thousandSeparator: '.'
    };
  }

  getCellData(value: any) {
    let cellValue: string;
    if (this.componentPipe && typeof this.pipeArguments !== 'undefined' && value !== undefined) {
      cellValue = this.componentPipe.transform(value, this.pipeArguments);
    }
    return cellValue;
  }
}
Solo resta añadir el render del tipo de cliente (dado que también hay un listado de clientes) y el render del movimiento al detalle de las cuentas
accounts-detail.component.html
<o-form attr="accountsTable" editable-detail=" false" service="branches" entity="accountBalance" keys="ACCOUNTID"
    columns="ACCOUNTID;ACCOUNTNUMBER" show-header="yes" header-actions="R;D" show-header-navigation="yes"
    keys-sql-types="INTEGER" class="fill-form">
    <div fxLayout="row" fxLayoutGap="8px">
        <o-text-input fxFlex="40" attr="ACCOUNTNUMBER" sql-type="STRING"></o-text-input>
        <o-combo fxFlex="50" attr="OFFICEID" service="branches" entity="branch" keys="OFFICEID" columns="OFFICEID;NAME"
            visible-columns="NAME" value-column="OFFICEID"></o-combo>
        <o-currency-input fxFlex="20" attr="BALANCE" currency-symbol="EUR" max-decimal-digits="2"></o-currency-input>
    </div>
    <div fxLayout="row" fxLayoutGap="8px">
        <o-date-input fxFlex="20" attr="ENDDATE"></o-date-input>
        <o-percent-input fxFlex="20" attr="INTERESRATE"></o-percent-input>
        <o-text-input fxFlex="60" attr="ACCOUNTTYP" sql-type="STRING"></o-text-input>
    </div>
    <div fxFlex fxLayout="row" fxLayoutGap="8px">
        <o-table fxFlex="50" attr="customersTable" service="customers" entity="vCustomerAccount" parent-keys="ACCOUNTID"
            keys="CUSTOMERACCOUNTID" columns="ID;NAME;SURNAME;CUSTOMERID;CUSTOMERACCOUNTID;CUSTOMERTYPEID"
            visible-columns="ID;NAME;SURNAME;CUSTOMERTYPEID" query-rows="15" insert-button="yes"
            insert-form-route="addcustomer/new" detail-mode="none">
            <o-table-column attr="ID" title="ID" content-align="center"></o-table-column>
            <o-table-column attr="NAME" title="NAME" content-align="center"></o-table-column>
            <o-table-column attr="SURNAME" title="SURNAME"></o-table-column>
            <o-table-column attr="CUSTOMERTYPEID" title="CUSTOMERTYPEID" content-align="center">
                <app-customertype-column-renderer></app-customertype-column-renderer>
            </o-table-column>
        </o-table>
        <o-table fxFlex="50" attr="movementsTable" service="movements" entity="movement" parent-keys="ACCOUNTID"
            keys="MOVEMENTID" columns="DATE_;CONCEPT;MOVEMENT;MOVEMENTTYPEID"
            visible-columns="DATE_;CONCEPT;MOVEMENT;MOVEMENTTYPEID" query-rows="15" insert-form-route="addMovement/new"
            detail-mode="none" insert-button="yes">
            <o-table-column attr="DATE_" title="DATE_" type="date" format="LL"></o-table-column>
            <o-table-column attr="MOVEMENT" title="MOVEMENT" content-align="center">
                <app-movement-column-renderer></app-movement-column-renderer>
            </o-table-column>
            <o-table-column attr="MOVEMENTTYPEID" title="MOVEMENTTYPEID">
                <o-table-cell-renderer-service service="movements" entity="movementType"
                    columns="DESCRIPTION;MOVEMENTTYPEID" value-column="DESCRIPTION">
                </o-table-cell-renderer-service>
            </o-table-column>
        </o-table>
    </div>
</o-form>- ontimize-web-tutorial
- e2e
- src
- app.e2e-spec.ts
- app.po.ts
- protractor.conf.js
- tsconfig.json
- src
- src
- app
- login
- login-routing.module.ts
- login.component.html
- login.component.scss
- login.component.ts
- login.module.ts
- login.theme.scss
- main
- accounts
- accounts-detail
- movement-column-renderer
- movement-column-renderer.component.css
- movement-column-renderer.component.html
- movement-column-renderer.component.ts
- accounts-detail.component.css
- accounts-detail.component.html
- accounts-detail.component.ts
- movement-column-renderer
- accounts-home
- account-number-render
- account-number-render.component.css
- account-number-render.component.html
- account-number-render.component.ts
- accounts-home.component.css
- accounts-home.component.html
- accounts-home.component.ts
- account-number-render
- accounts-new
- accounts-new.component.css
- accounts-new.component.html
- accounts-new.component.ts
- add-customer
- add-customer.component.css
- add-customer.component.html
- add-customer.component.ts
- add-movement
- add-movement.component.css
- add-movement.component.html
- add-movement.component.ts
- accounts-routing.module.ts
- accounts.module.ts
- accounts-detail
- branches
- branches-detail
- branches-detail.component.css
- branches-detail.component.html
- branches-detail.component.ts
- branches-home
- branches-home.component.css
- branches-home.component.html
- branches-home.component.ts
- branches-new
- branches-new.component.css
- branches-new.component.html
- branches-new.component.ts
- branches-routing.module.ts
- branches.module.ts
- branches-detail
- customers
- customers-detail
- customers-detail.component.css
- customers-detail.component.html
- customers-detail.component.ts
- customers-home
- customertype-column-renderer
- customertype-column-renderer.component.css
- customertype-column-renderer.component.html
- customertype-column-renderer.component.ts
- customers-home.component.css
- customers-home.component.html
- customers-home.component.ts
- customertype-column-renderer
- customers-new
- customers-new.component.css
- customers-new.component.html
- customers-new.component.ts
- customers-routing.module.ts
- customers.module.ts
- customers-detail
- employees
- employees-detail
- employees-detail.component.css
- employees-detail.component.html
- employees-detail.component.ts
- employees-home
- employees-home.component.css
- employees-home.component.html
- employees-home.component.ts
- employees-routing.module.ts
- employees.module.ts
- employees-detail
- home
- home-routing.module.ts
- home.component.html
- home.component.scss
- home.component.ts
- home.module.ts
- main-routing.module.ts
- main.component.html
- main.component.scss
- main.component.ts
- main.module.ts
- accounts
- shared
- app.menu.config.ts
- app.services.config.ts
- shared.module.ts
- app-routing.module.ts
- app.component.html
- app.component.scss
- app.component.spec.ts
- app.component.ts
- app.config.ts
- app.module.ts
- login
- assets
- css
- app.scss
- loader.css
- i18n
- en.json
- es.json
- icons
- ontimize128.png
- ontimize16.png
- ontimize256.png
- ontimize32.png
- ontimize48.png
- ontimize64.png
- ontimize72.png
- ontimize96.png
- images
- login_bg.png
- no-image.png
- normal_24.png
- ontimize.png
- ontimize_web_log.png
- other_24.png
- sidenav-closed.png
- sidenav-opened.png
- user_profile.png
- vip_24.png
- js
- domchange.js
- keyboard.js
- .gitkeep
- css
- environments
- environment.prod.ts
- environment.ts
- favicon.ico
- index.html
- main.ts
- manifest.webmanifest
- polyfills.ts
- styles.scss
- test.ts
- app
- .browserslistrc
- .editorconfig
- .eslintrc.json
- .gitignore
- angular.json
- karma.conf.js
- ngsw-config.json
- package-lock.json
- package.json
- README.md
- tsconfig.app.json
- tsconfig.json
- tsconfig.spec.json
- e2e
Este es el aspecto final de los listados de clientes y el aspecto de la vista de cuentas
