Crear el módulo y formularios de empleados
Crear el módulo de empleados
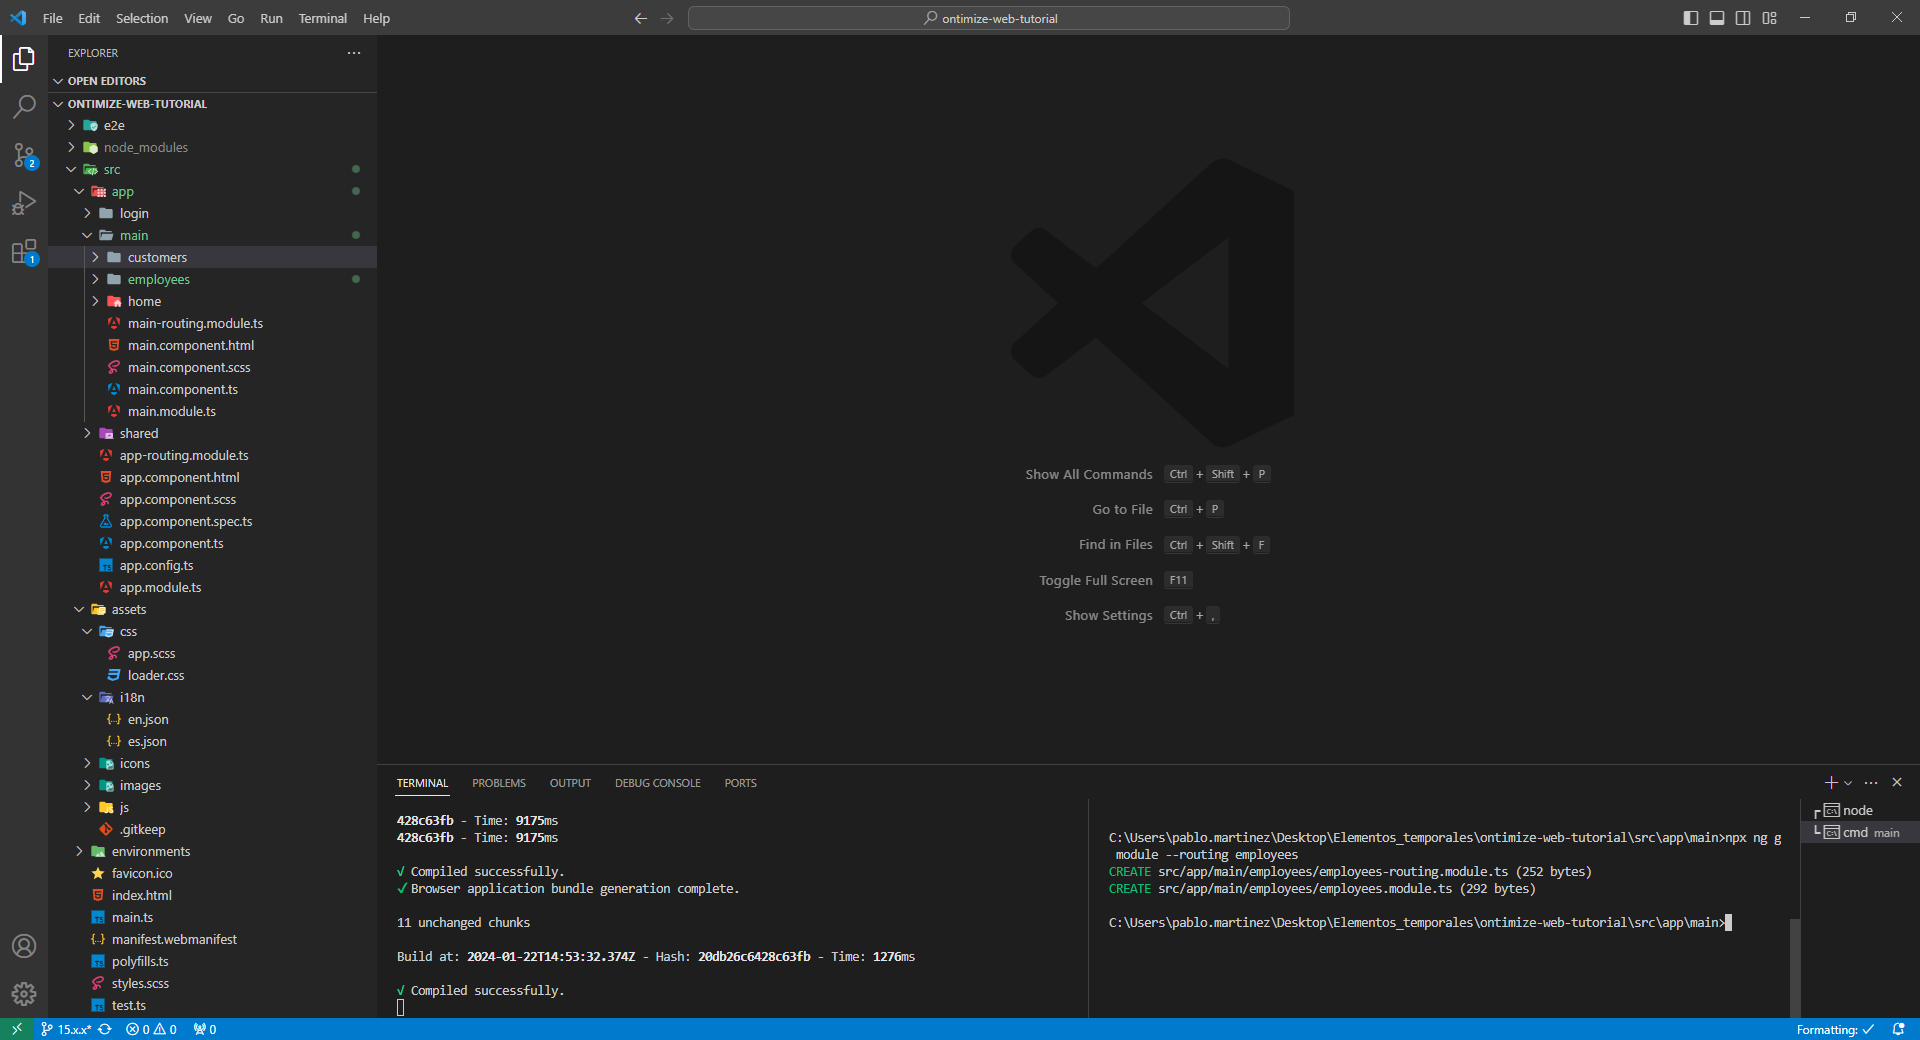
Ahora añadiremos el módulo de empleados, con sus correspondientes componentes, para añadir la gestión de los empleados. Nos situamos en el terminal, dentro del módulo main y ejecutamos el siguiente comando:
npx ng g module --routing employees

- bankmanager-web
- e2e
- src
- app.e2e-spec.ts
- app.po.ts
- protractor.conf.js
- tsconfig.json
- src
- src
- app
- login
- login-routing.module.ts
- login.component.html
- login.component.scss
- login.component.ts
- login.module.ts
- login.theme.scss
- main
- customers
- customers-detail
- customers-detail.component.css
- customers-detail.component.html
- customers-detail.component.ts
- customers-home
- customers-home.component.css
- customers-home.component.html
- customers-home.component.ts
- customers-new
- customers-new.component.css
- customers-new.component.html
- customers-new.component.ts
- customers-routing.module.ts
- customers.module.ts
- customers-detail
- employees
- employees-routing.module.ts
- employees.module.ts
- home
- home-routing.module.ts
- home.component.html
- home.component.scss
- home.component.ts
- home.module.ts
- main-routing.module.ts
- main.component.html
- main.component.scss
- main.component.ts
- main.module.ts
- customers
- shared
- app.menu.config.ts
- app.services.config.ts
- shared.module.ts
- app-routing.module.ts
- app.component.html
- app.component.scss
- app.component.spec.ts
- app.component.ts
- app.config.ts
- app.module.ts
- login
- assets
- css
- app.scss
- loader.css
- i18n
- en.json
- es.json
- icons
- ontimize128.png
- ontimize16.png
- ontimize256.png
- ontimize32.png
- ontimize48.png
- ontimize64.png
- ontimize72.png
- ontimize96.png
- images
- login_bg.png
- no-image.png
- ontimize.png
- ontimize_web_log.png
- sidenav-closed.png
- sidenav-opened.png
- user_profile.png
- js
- domchange.js
- keyboard.js
- .gitkeep
- css
- environments
- environment.prod.ts
- environment.ts
- favicon.ico
- index.html
- main.ts
- manifest.webmanifest
- polyfills.ts
- styles.scss
- test.ts
- app
- .browserslistrc
- .editorconfig
- .eslintrc.json
- .gitignore
- angular.json
- karma.conf.js
- ngsw-config.json
- package-lock.json
- package.json
- README.md
- tsconfig.app.json
- tsconfig.json
- tsconfig.spec.json
- e2e
De la misma manera que hemos hecho en el módulo de clientes, al usar componentes de Ontimize Web, es necesario añadir el fichero de importación del módulo de Ontimize Web y declararlo como módulo importado.
employees.module.ts
import { NgModule } from '@angular/core';
import { CommonModule } from '@angular/common';
import { OntimizeWebModule } from 'ontimize-web-ngx';
import { EmployeesRoutingModule } from './employees-routing.module';


@NgModule({
  declarations: [],
  imports: [
    CommonModule,
    OntimizeWebModule,
    EmployeesRoutingModule
  ]
})
export class EmployeesModule { }
main-routing.module.ts
import { NgModule } from '@angular/core';
import { RouterModule, Routes } from '@angular/router';
import { AuthGuardService } from 'ontimize-web-ngx';

import { MainComponent } from './main.component';

export const routes: Routes = [
  {
    path: '',
    component: MainComponent,
    canActivate: [AuthGuardService],
    children: [
      { path: '', redirectTo: 'home', pathMatch: 'full' },
      { path: 'home', loadChildren: () => import('./home/home.module').then(m => m.HomeModule) },
      { path: 'customers', loadChildren: () => import('./customers/customers.module').then(m => m.CustomersModule) },
      { path: 'employees', loadChildren: () => import('./employees/employees.module').then(m => m.EmployeesModule) }
    ]
  }
];

@NgModule({
  imports: [RouterModule.forChild(routes)],
  exports: [RouterModule]
})
export class MainRoutingModule { }- bankmanager-web
- e2e
- src
- app.e2e-spec.ts
- app.po.ts
- protractor.conf.js
- tsconfig.json
- src
- src
- app
- login
- login-routing.module.ts
- login.component.html
- login.component.scss
- login.component.ts
- login.module.ts
- login.theme.scss
- main
- customers
- customers-detail
- customers-detail.component.css
- customers-detail.component.html
- customers-detail.component.ts
- customers-home
- customers-home.component.css
- customers-home.component.html
- customers-home.component.ts
- customers-new
- customers-new.component.css
- customers-new.component.html
- customers-new.component.ts
- customers-routing.module.ts
- customers.module.ts
- customers-detail
- employees
- employees-routing.module.ts
- employees.module.ts
- home
- home-routing.module.ts
- home.component.html
- home.component.scss
- home.component.ts
- home.module.ts
- main-routing.module.ts
- main.component.html
- main.component.scss
- main.component.ts
- main.module.ts
- customers
- shared
- app.menu.config.ts
- app.services.config.ts
- shared.module.ts
- app-routing.module.ts
- app.component.html
- app.component.scss
- app.component.spec.ts
- app.component.ts
- app.config.ts
- app.module.ts
- login
- assets
- css
- app.scss
- loader.css
- i18n
- en.json
- es.json
- icons
- ontimize128.png
- ontimize16.png
- ontimize256.png
- ontimize32.png
- ontimize48.png
- ontimize64.png
- ontimize72.png
- ontimize96.png
- images
- login_bg.png
- no-image.png
- ontimize.png
- ontimize_web_log.png
- sidenav-closed.png
- sidenav-opened.png
- user_profile.png
- js
- domchange.js
- keyboard.js
- .gitkeep
- css
- environments
- environment.prod.ts
- environment.ts
- favicon.ico
- index.html
- main.ts
- manifest.webmanifest
- polyfills.ts
- styles.scss
- test.ts
- app
- .browserslistrc
- .editorconfig
- .eslintrc.json
- .gitignore
- angular.json
- karma.conf.js
- ngsw-config.json
- package-lock.json
- package.json
- README.md
- tsconfig.app.json
- tsconfig.json
- tsconfig.spec.json
- e2e
Crear componente base de empleados
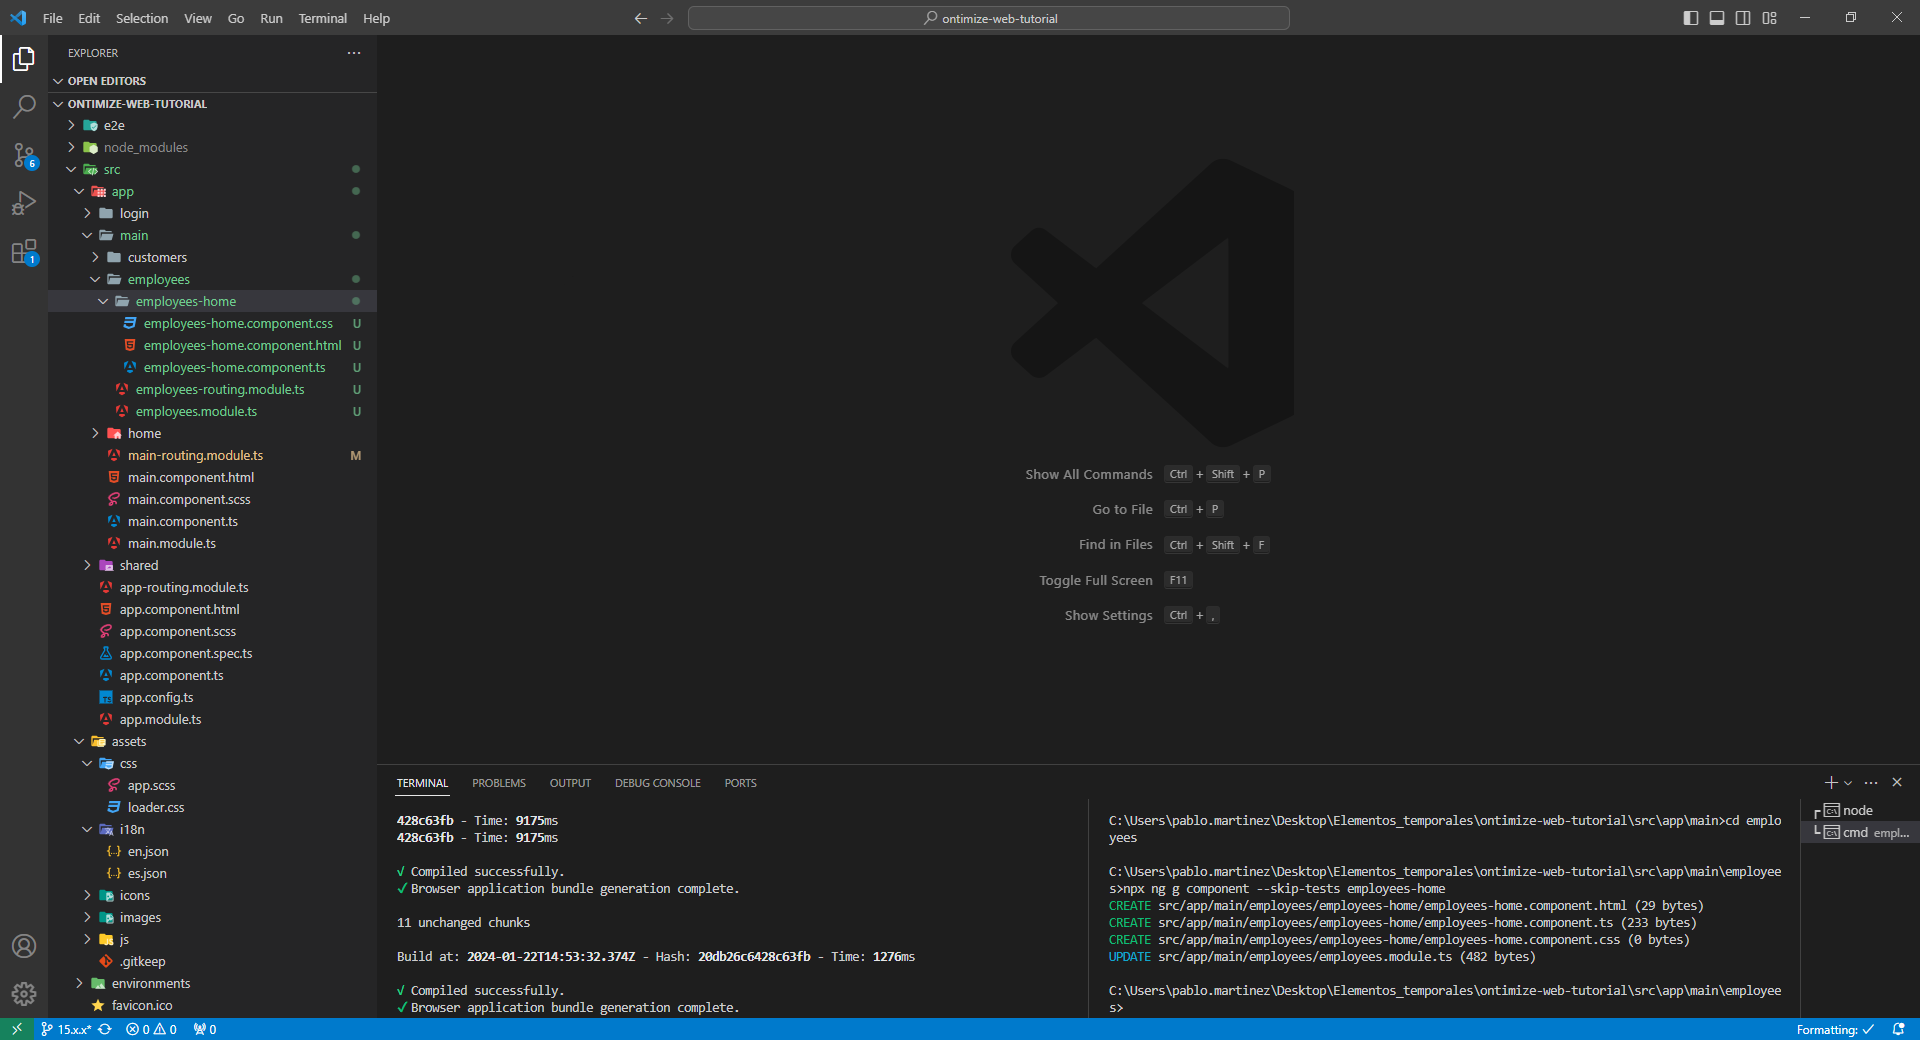
Crearemos el componente base de empleados de dentro de la carpeta del módulo employees y ejecutamos el siguiente comando para crear la carpeta employees-home que contendrá el nuevo componente:
npx ng g component --skip-tests employees-home

- bankmanager-web
- e2e
- src
- app.e2e-spec.ts
- app.po.ts
- protractor.conf.js
- tsconfig.json
- src
- src
- app
- login
- login-routing.module.ts
- login.component.html
- login.component.scss
- login.component.ts
- login.module.ts
- login.theme.scss
- main
- customers
- customers-detail
- customers-detail.component.css
- customers-detail.component.html
- customers-detail.component.ts
- customers-home
- customers-home.component.css
- customers-home.component.html
- customers-home.component.ts
- customers-new
- customers-new.component.css
- customers-new.component.html
- customers-new.component.ts
- customers-routing.module.ts
- customers.module.ts
- customers-detail
- employees
- employees-home
- employees-home.component.css
- employees-home.component.html
- employees-home.component.ts
- employees-routing.module.ts
- employees.module.ts
- employees-home
- home
- home-routing.module.ts
- home.component.html
- home.component.scss
- home.component.ts
- home.module.ts
- main-routing.module.ts
- main.component.html
- main.component.scss
- main.component.ts
- main.module.ts
- customers
- shared
- app.menu.config.ts
- app.services.config.ts
- shared.module.ts
- app-routing.module.ts
- app.component.html
- app.component.scss
- app.component.spec.ts
- app.component.ts
- app.config.ts
- app.module.ts
- login
- assets
- css
- app.scss
- loader.css
- i18n
- en.json
- es.json
- icons
- ontimize128.png
- ontimize16.png
- ontimize256.png
- ontimize32.png
- ontimize48.png
- ontimize64.png
- ontimize72.png
- ontimize96.png
- images
- login_bg.png
- no-image.png
- ontimize.png
- ontimize_web_log.png
- sidenav-closed.png
- sidenav-opened.png
- user_profile.png
- js
- domchange.js
- keyboard.js
- .gitkeep
- css
- environments
- environment.prod.ts
- environment.ts
- favicon.ico
- index.html
- main.ts
- manifest.webmanifest
- polyfills.ts
- styles.scss
- test.ts
- app
- .browserslistrc
- .editorconfig
- .eslintrc.json
- .gitignore
- angular.json
- karma.conf.js
- ngsw-config.json
- package-lock.json
- package.json
- README.md
- tsconfig.app.json
- tsconfig.json
- tsconfig.spec.json
- e2e
A continuación, se muestra el mockup del listado de los empleados, y los archivos que es necesario modificar para crearlo y añadirlo al menú lateral.
employees-home.component.html
<o-form-layout-manager attr="employeesHome" title="{{'EMPLOYEES' | oTranslate }}" separator=" " mode="dialog"
    label-columns="EMPLOYEENAME;EMPLOYEESURNAME">
    <o-table attr="employeesTable" service="employees" entity="employee" keys="EMPLOYEEID"
        columns="EMPLOYEEID;EMPLOYEENAME;EMPLOYEESURNAME;EMPLOYEEPHOTO;EMPLOYEEADDRESS;EMPLOYEESTARTDATE;EMPLOYEEEMAIL;OFFICEID;EMPLOYEETYPEID"
        visible-columns="EMPLOYEEPHOTO;EMPLOYEENAME;EMPLOYEESURNAME;EMPLOYEEEMAIL;EMPLOYEEADDRESS;EMPLOYEESTARTDATE"
        query-rows="15">
        <o-table-column attr="EMPLOYEEPHOTO" title="EMPLOYEEPHOTO" orderable="no" searchable="no" type="image"
            avatar="no" empty-image="assets/images/no-image.png" image-type="base64" width="150px"></o-table-column>
        <o-table-column attr="EMPLOYEESTARTDATE" title="EMPLOYEESTARTDATE" type="date" format="LL"></o-table-column>
        <o-table-column attr="EMPLOYEENAME" title="EMPLOYEENAME" width="150px"></o-table-column>
        <o-table-column attr="EMPLOYEESURNAME" title="EMPLOYEESURNAME" width="150px"></o-table-column>
    </o-table>
</o-form-layout-manager>
employees-routing.module.ts
import { NgModule } from '@angular/core';
import { RouterModule, Routes } from '@angular/router';
import { EmployeesHomeComponent } from './employees-home/employees-home.component';

const routes: Routes = [{
  path: '',
  component: EmployeesHomeComponent
}];

@NgModule({
  imports: [RouterModule.forChild(routes)],
  exports: [RouterModule]
})
export class EmployeesRoutingModule { }
employees.module.ts
import { NgModule } from '@angular/core';
import { CommonModule } from '@angular/common';
import { OntimizeWebModule } from 'ontimize-web-ngx';
import { EmployeesRoutingModule } from './employees-routing.module';
import { EmployeesHomeComponent } from './employees-home/employees-home.component';


@NgModule({
  declarations: [
    EmployeesHomeComponent
  ],
  imports: [
    CommonModule,
    OntimizeWebModule,
    EmployeesRoutingModule
  ]
})
export class EmployeesModule { }
app.menu.config.ts
import { MenuRootItem } from 'ontimize-web-ngx';

export const MENU_CONFIG: MenuRootItem[] = [
  { id: 'home', name: 'HOME', icon: 'home', route: '/main/home' },
  { id: 'customers', name: 'CUSTOMERS', icon: 'people', route: '/main/customers' },
  { id: 'employees', name: 'EMPLOYEES', icon: 'business_center', route: '/main/employees' },
  { id: 'logout', name: 'LOGOUT', route: '/login', icon: 'power_settings_new', confirm: 'yes' }
];
app.services.config.ts
export const SERVICE_CONFIG: Object = {
  'customers': {
    'path': '/customers'
  },
  'employees': {
    'path': '/employees'
  }
};
en.json
{
  ...
  "EMPLOYEES": "Employees",
  "EMPLOYEEID": "Employee Id.",
  "EMPLOYEETYPEID": "Employee type",
  "EMPLOYEENAME": "Name",
  "EMPLOYEESURNAME": "Surname",
  "EMPLOYEEADDRESS": "Address",
  "EMPLOYEECOMMENTS": "Comments",
  "EMPLOYEESTARTDATE": "Start date",
  "EMPLOYEEPHOTO": "Photo",
  "EMPLOYEEEMAIL": "Mail",
  "OFFICEID": "Office",
  "EMPLOYEEPHONE": "Phone",
  "EMPLOYEE_PERSONAL_INFORMATION": "Employee details"
}
es.json
{
  ...
  "EMPLOYEES": "Empleados",
  "EMPLOYEEID": "Id. Empleado",
  "EMPLOYEETYPEID": "Tipo de empleado",
  "EMPLOYEENAME": "Nombre",
  "EMPLOYEESURNAME": "Apellidos",
  "EMPLOYEEADDRESS": "Dirección",
  "EMPLOYEECOMMENTS": "Comentarios",
  "EMPLOYEESTARTDATE": "Fecha de inicio",
  "EMPLOYEEPHOTO": "Fotografía",
  "EMPLOYEEEMAIL": "Correo",
  "OFFICEID": "Oficina",
  "EMPLOYEEPHONE": "Teléfono",
  "EMPLOYEE_PERSONAL_INFORMATION": "Detalles empleado"
}- bankmanager-web
- e2e
- src
- app.e2e-spec.ts
- app.po.ts
- protractor.conf.js
- tsconfig.json
- src
- src
- app
- login
- login-routing.module.ts
- login.component.html
- login.component.scss
- login.component.ts
- login.module.ts
- login.theme.scss
- main
- customers
- customers-detail
- customers-detail.component.css
- customers-detail.component.html
- customers-detail.component.ts
- customers-home
- customers-home.component.css
- customers-home.component.html
- customers-home.component.ts
- customers-new
- customers-new.component.css
- customers-new.component.html
- customers-new.component.ts
- customers-routing.module.ts
- customers.module.ts
- customers-detail
- employees
- employees-home
- employees-home.component.css
- employees-home.component.html
- employees-home.component.ts
- employees-routing.module.ts
- employees.module.ts
- employees-home
- home
- home-routing.module.ts
- home.component.html
- home.component.scss
- home.component.ts
- home.module.ts
- main-routing.module.ts
- main.component.html
- main.component.scss
- main.component.ts
- main.module.ts
- customers
- shared
- app.menu.config.ts
- app.services.config.ts
- shared.module.ts
- app-routing.module.ts
- app.component.html
- app.component.scss
- app.component.spec.ts
- app.component.ts
- app.config.ts
- app.module.ts
- login
- assets
- css
- app.scss
- loader.css
- i18n
- en.json
- es.json
- icons
- ontimize128.png
- ontimize16.png
- ontimize256.png
- ontimize32.png
- ontimize48.png
- ontimize64.png
- ontimize72.png
- ontimize96.png
- images
- login_bg.png
- no-image.png
- ontimize.png
- ontimize_web_log.png
- sidenav-closed.png
- sidenav-opened.png
- user_profile.png
- js
- domchange.js
- keyboard.js
- .gitkeep
- css
- environments
- environment.prod.ts
- environment.ts
- favicon.ico
- index.html
- main.ts
- manifest.webmanifest
- polyfills.ts
- styles.scss
- test.ts
- app
- .browserslistrc
- .editorconfig
- .eslintrc.json
- .gitignore
- angular.json
- karma.conf.js
- ngsw-config.json
- package-lock.json
- package.json
- README.md
- tsconfig.app.json
- tsconfig.json
- tsconfig.spec.json
- e2e
Crear el componente detalle de empleados
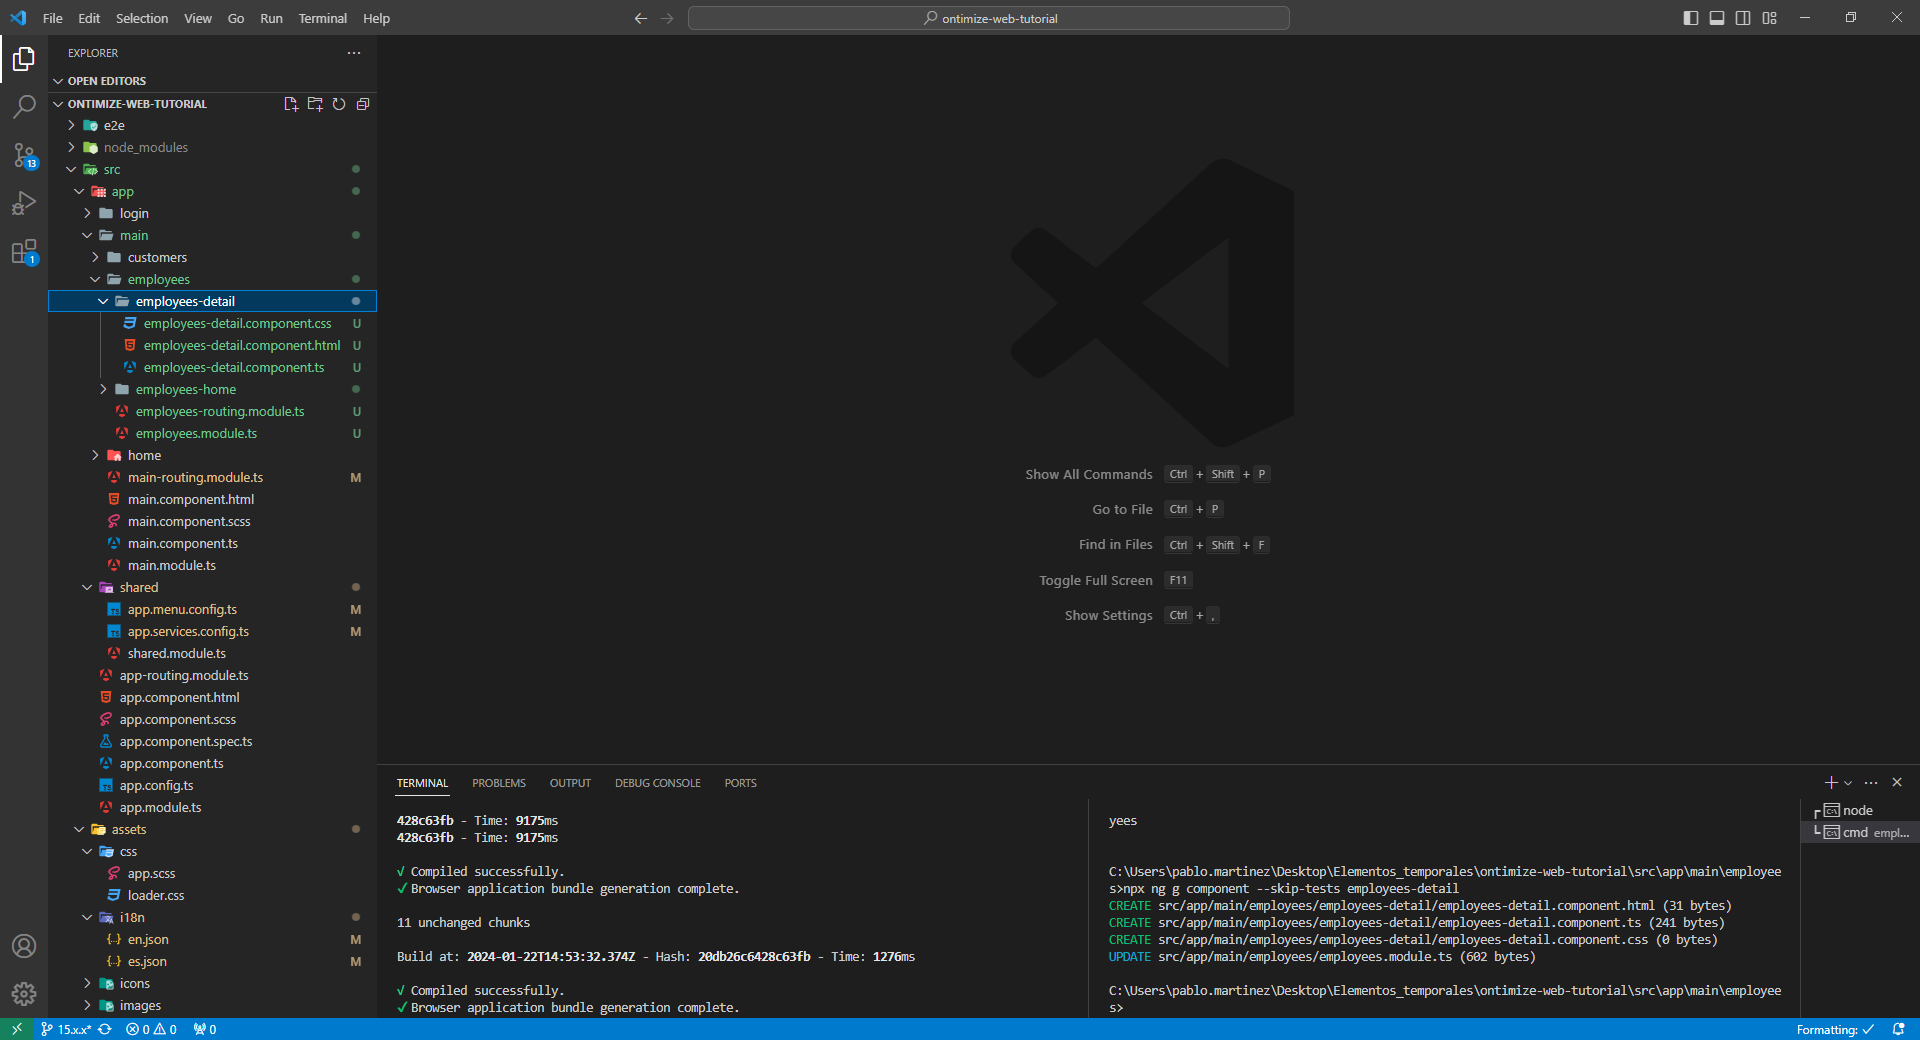
Para crear el componente de detalle, nos situamos detro de la carpeta employees, a la altura de la carpeta employees-home y ejecutamos el comando para generar un nuevo componente:
npx ng g component --skip-tests employees-detail

- bankmanager-web
- e2e
- src
- app.e2e-spec.ts
- app.po.ts
- protractor.conf.js
- tsconfig.json
- src
- src
- app
- login
- login-routing.module.ts
- login.component.html
- login.component.scss
- login.component.ts
- login.module.ts
- login.theme.scss
- main
- customers
- customers-detail
- customers-detail.component.css
- customers-detail.component.html
- customers-detail.component.ts
- customers-home
- customers-home.component.css
- customers-home.component.html
- customers-home.component.ts
- customers-new
- customers-new.component.css
- customers-new.component.html
- customers-new.component.ts
- customers-routing.module.ts
- customers.module.ts
- customers-detail
- employees
- employees-detail
- employees-detail.component.css
- employees-detail.component.html
- employees-detail.component.ts
- employees-home
- employees-home.component.css
- employees-home.component.html
- employees-home.component.ts
- employees-routing.module.ts
- employees.module.ts
- employees-detail
- home
- home-routing.module.ts
- home.component.html
- home.component.scss
- home.component.ts
- home.module.ts
- main-routing.module.ts
- main.component.html
- main.component.scss
- main.component.ts
- main.module.ts
- customers
- shared
- app.menu.config.ts
- app.services.config.ts
- shared.module.ts
- app-routing.module.ts
- app.component.html
- app.component.scss
- app.component.spec.ts
- app.component.ts
- app.config.ts
- app.module.ts
- login
- assets
- css
- app.scss
- loader.css
- i18n
- en.json
- es.json
- icons
- ontimize128.png
- ontimize16.png
- ontimize256.png
- ontimize32.png
- ontimize48.png
- ontimize64.png
- ontimize72.png
- ontimize96.png
- images
- login_bg.png
- no-image.png
- ontimize.png
- ontimize_web_log.png
- sidenav-closed.png
- sidenav-opened.png
- user_profile.png
- js
- domchange.js
- keyboard.js
- .gitkeep
- css
- environments
- environment.prod.ts
- environment.ts
- favicon.ico
- index.html
- main.ts
- manifest.webmanifest
- polyfills.ts
- styles.scss
- test.ts
- app
- .browserslistrc
- .editorconfig
- .eslintrc.json
- .gitignore
- angular.json
- karma.conf.js
- ngsw-config.json
- package-lock.json
- package.json
- README.md
- tsconfig.app.json
- tsconfig.json
- tsconfig.spec.json
- e2e
Modificaremos el fichero employees.module.ts, para añadir el import del nuevo componente, situándolo en el array de declaraciones. De la misma manera que hemos hecho en tutoriales anteriores, estableceremos la nueva ruta en el fichero employees-routing.module.ts. Dado que esta vez queremos usar el mismo formulario tanto para editar como para insertar, añadiremos las rutas necesarias al fichero employees-routing.module.ts, declarando el componente de detalle de los empleados.
employees.module.ts
import { NgModule } from '@angular/core';
import { CommonModule } from '@angular/common';
import { OntimizeWebModule } from 'ontimize-web-ngx';
import { EmployeesRoutingModule } from './employees-routing.module';
import { EmployeesHomeComponent } from './employees-home/employees-home.component';
import { EmployeesDetailComponent } from './employees-detail/employees-detail.component';


@NgModule({
  declarations: [
    EmployeesHomeComponent,
    EmployeesDetailComponent
  ],
  imports: [
    CommonModule,
    OntimizeWebModule,
    EmployeesRoutingModule
  ]
})
export class EmployeesModule { }
employees-routing.module.ts
import { NgModule } from '@angular/core';
import { RouterModule, Routes } from '@angular/router';
import { EmployeesHomeComponent } from './employees-home/employees-home.component';
import { EmployeesDetailComponent } from './employees-detail/employees-detail.component';

const routes: Routes = [{
  path: '',
  component: EmployeesHomeComponent
},
{
  path: "new",
  component: EmployeesDetailComponent
},
{
  path: ":EMPLOYEEID",
  component: EmployeesDetailComponent
}];

@NgModule({
  imports: [RouterModule.forChild(routes)],
  exports: [RouterModule]
})
export class EmployeesRoutingModule { }- bankmanager-web
- e2e
- src
- app.e2e-spec.ts
- app.po.ts
- protractor.conf.js
- tsconfig.json
- src
- src
- app
- login
- login-routing.module.ts
- login.component.html
- login.component.scss
- login.component.ts
- login.module.ts
- login.theme.scss
- main
- customers
- customers-detail
- customers-detail.component.css
- customers-detail.component.html
- customers-detail.component.ts
- customers-home
- customers-home.component.css
- customers-home.component.html
- customers-home.component.ts
- customers-new
- customers-new.component.css
- customers-new.component.html
- customers-new.component.ts
- customers-routing.module.ts
- customers.module.ts
- customers-detail
- employees
- employees-detail
- employees-detail.component.css
- employees-detail.component.html
- employees-detail.component.ts
- employees-home
- employees-home.component.css
- employees-home.component.html
- employees-home.component.ts
- employees-routing.module.ts
- employees.module.ts
- employees-detail
- home
- home-routing.module.ts
- home.component.html
- home.component.scss
- home.component.ts
- home.module.ts
- main-routing.module.ts
- main.component.html
- main.component.scss
- main.component.ts
- main.module.ts
- customers
- shared
- app.menu.config.ts
- app.services.config.ts
- shared.module.ts
- app-routing.module.ts
- app.component.html
- app.component.scss
- app.component.spec.ts
- app.component.ts
- app.config.ts
- app.module.ts
- login
- assets
- css
- app.scss
- loader.css
- i18n
- en.json
- es.json
- icons
- ontimize128.png
- ontimize16.png
- ontimize256.png
- ontimize32.png
- ontimize48.png
- ontimize64.png
- ontimize72.png
- ontimize96.png
- images
- login_bg.png
- no-image.png
- ontimize.png
- ontimize_web_log.png
- sidenav-closed.png
- sidenav-opened.png
- user_profile.png
- js
- domchange.js
- keyboard.js
- .gitkeep
- css
- environments
- environment.prod.ts
- environment.ts
- favicon.ico
- index.html
- main.ts
- manifest.webmanifest
- polyfills.ts
- styles.scss
- test.ts
- app
- .browserslistrc
- .editorconfig
- .eslintrc.json
- .gitignore
- angular.json
- karma.conf.js
- ngsw-config.json
- package-lock.json
- package.json
- README.md
- tsconfig.app.json
- tsconfig.json
- tsconfig.spec.json
- e2e
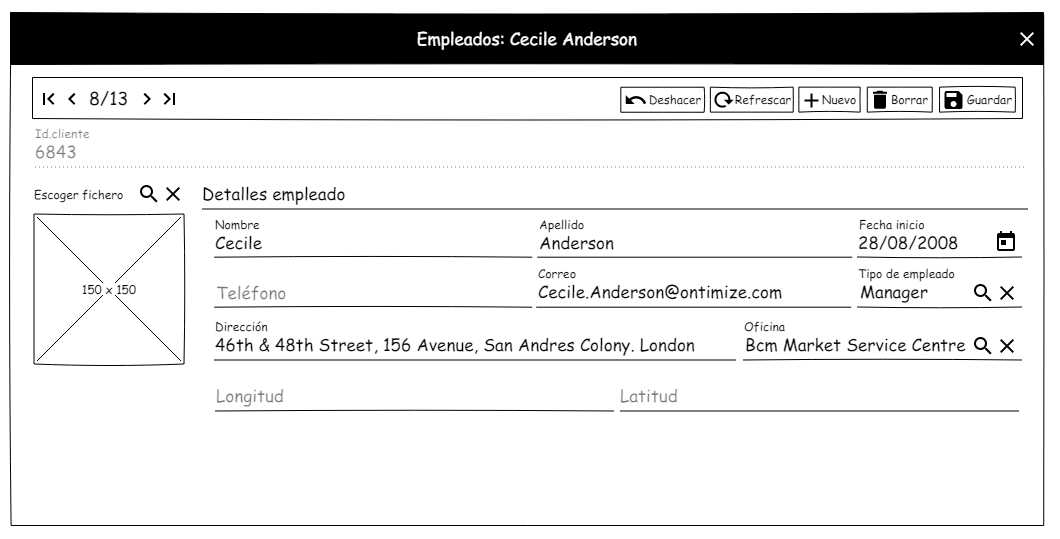
Modificamos el fichero employees-detail.component.html para crear el formulario detalle de los empleados, imitando el siguiente mockup.

employees-detail.component.html
<o-form attr="employeesDetail" service="employees" entity="employee" keys="EMPLOYEEID" header-actions="R;U;D"
    show-header-navigation="yes">
    <o-integer-input attr="EMPLOYEEID" sql-type="INTEGER" enabled="no"></o-integer-input>
    <div fxLayout="row">
        <div>
            <o-image attr="EMPLOYEEPHOTO" empty-image="assets/images/no-image.png" sql-type="OTHER"></o-image>
        </div>
        <o-column fxFlex title="EMPLOYEE_PERSONAL_INFORMATION">
            <div fxLayout="row" fxLayoutGap="8px">
                <o-text-input fxFlex="40" attr="EMPLOYEENAME" required="yes"></o-text-input>
                <o-text-input fxFlex="40" attr="EMPLOYEESURNAME" required="yes"></o-text-input>
                <o-date-input fxFlex="20" attr="EMPLOYEESTARTDATE"></o-date-input>
            </div>
            <div fxLayout="row" fxLayoutGap="8px">
                <o-text-input fxFlex="40" attr="EMPLOYEEPHONE"></o-text-input>
                <o-text-input fxFlex="40" attr="EMPLOYEEEMAIL"></o-text-input>
                <o-list-picker fxFlex="20" attr="EMPLOYEETYPEID" service="employees" entity="employeeType"
                    keys="EMPLOYEETYPEID" columns="EMPLOYEETYPEID;EMPLOYEETYPENAME" visible-columns="EMPLOYEETYPENAME"
                    value-column="EMPLOYEETYPEID"></o-list-picker>
            </div>
            <div fxLayout="row" fxLayoutGap="8px">
                <o-text-input fxFlex="65" attr="EMPLOYEEADDRESS"></o-text-input>
                <o-combo fxFlex="35" attr="OFFICEID" required="yes" service="branches" entity="branch" keys="OFFICEID"
                    columns="OFFICEID;NAME" visible-columns="NAME" value-column="OFFICEID"></o-combo>
            </div>
            <div fxLayout="row" fxLayoutGap="8px">
                <o-real-input fxFlex="50" attr="LONGITUDE" decimal-separator="," max-decimal-digits="10"
                    min-decimal-digits="0"></o-real-input>
                <o-real-input fxFlex="50" attr="LATITUDE" decimal-separator="," max-decimal-digits="10"
                    min-decimal-digits="0"></o-real-input>
            </div>
        </o-column>
    </div>
</o-form>
El campo <o-combo attr="OFFICEID" ... > llama a un servicio y a una entidad que no ha sido definida hasta el momento. Este nuevo servicio hace referencia al servicio de las sucursales, por lo que es necesario definir cuál es el 'path' de la petición. En este caso, el 'path' será /branches.
app.services.config.ts
export const SERVICE_CONFIG: Object = {
  'customers': {
    'path': '/customers'
  },
  'employees': {
    'path': '/employees'
  },
  'branches': {
    'path': '/branches'
  }
};- bankmanager-web
- e2e
- src
- app.e2e-spec.ts
- app.po.ts
- protractor.conf.js
- tsconfig.json
- src
- src
- app
- login
- login-routing.module.ts
- login.component.html
- login.component.scss
- login.component.ts
- login.module.ts
- login.theme.scss
- main
- customers
- customers-detail
- customers-detail.component.css
- customers-detail.component.html
- customers-detail.component.ts
- customers-home
- customers-home.component.css
- customers-home.component.html
- customers-home.component.ts
- customers-new
- customers-new.component.css
- customers-new.component.html
- customers-new.component.ts
- customers-routing.module.ts
- customers.module.ts
- customers-detail
- employees
- employees-detail
- employees-detail.component.css
- employees-detail.component.html
- employees-detail.component.ts
- employees-home
- employees-home.component.css
- employees-home.component.html
- employees-home.component.ts
- employees-routing.module.ts
- employees.module.ts
- employees-detail
- home
- home-routing.module.ts
- home.component.html
- home.component.scss
- home.component.ts
- home.module.ts
- main-routing.module.ts
- main.component.html
- main.component.scss
- main.component.ts
- main.module.ts
- customers
- shared
- app.menu.config.ts
- app.services.config.ts
- shared.module.ts
- app-routing.module.ts
- app.component.html
- app.component.scss
- app.component.spec.ts
- app.component.ts
- app.config.ts
- app.module.ts
- login
- assets
- css
- app.scss
- loader.css
- i18n
- en.json
- es.json
- icons
- ontimize128.png
- ontimize16.png
- ontimize256.png
- ontimize32.png
- ontimize48.png
- ontimize64.png
- ontimize72.png
- ontimize96.png
- images
- login_bg.png
- no-image.png
- ontimize.png
- ontimize_web_log.png
- sidenav-closed.png
- sidenav-opened.png
- user_profile.png
- js
- domchange.js
- keyboard.js
- .gitkeep
- css
- environments
- environment.prod.ts
- environment.ts
- favicon.ico
- index.html
- main.ts
- manifest.webmanifest
- polyfills.ts
- styles.scss
- test.ts
- app
- .browserslistrc
- .editorconfig
- .eslintrc.json
- .gitignore
- angular.json
- karma.conf.js
- ngsw-config.json
- package-lock.json
- package.json
- README.md
- tsconfig.app.json
- tsconfig.json
- tsconfig.spec.json
- e2e