Make some changes
Overview
In this section we are going to make some simple changes in the code of the QuickStart app. We are going to see how to add a form field into a form. Once added, we are going to learn how to listen the component events. Finally, we are going to navigate to another screen of the application.
Add a field
We are going to add a date field into the detail form of a client. First of all, we are going take a look at the layout of this form. After logging in, click on the menu item Views -> Customers. A table with several clients information will be shown. At this point, we will prefilter the results and select an client and going to the detail form (clicking on the magnifying glass row button). The aspect of the detail form is like this picture (check it on live example):
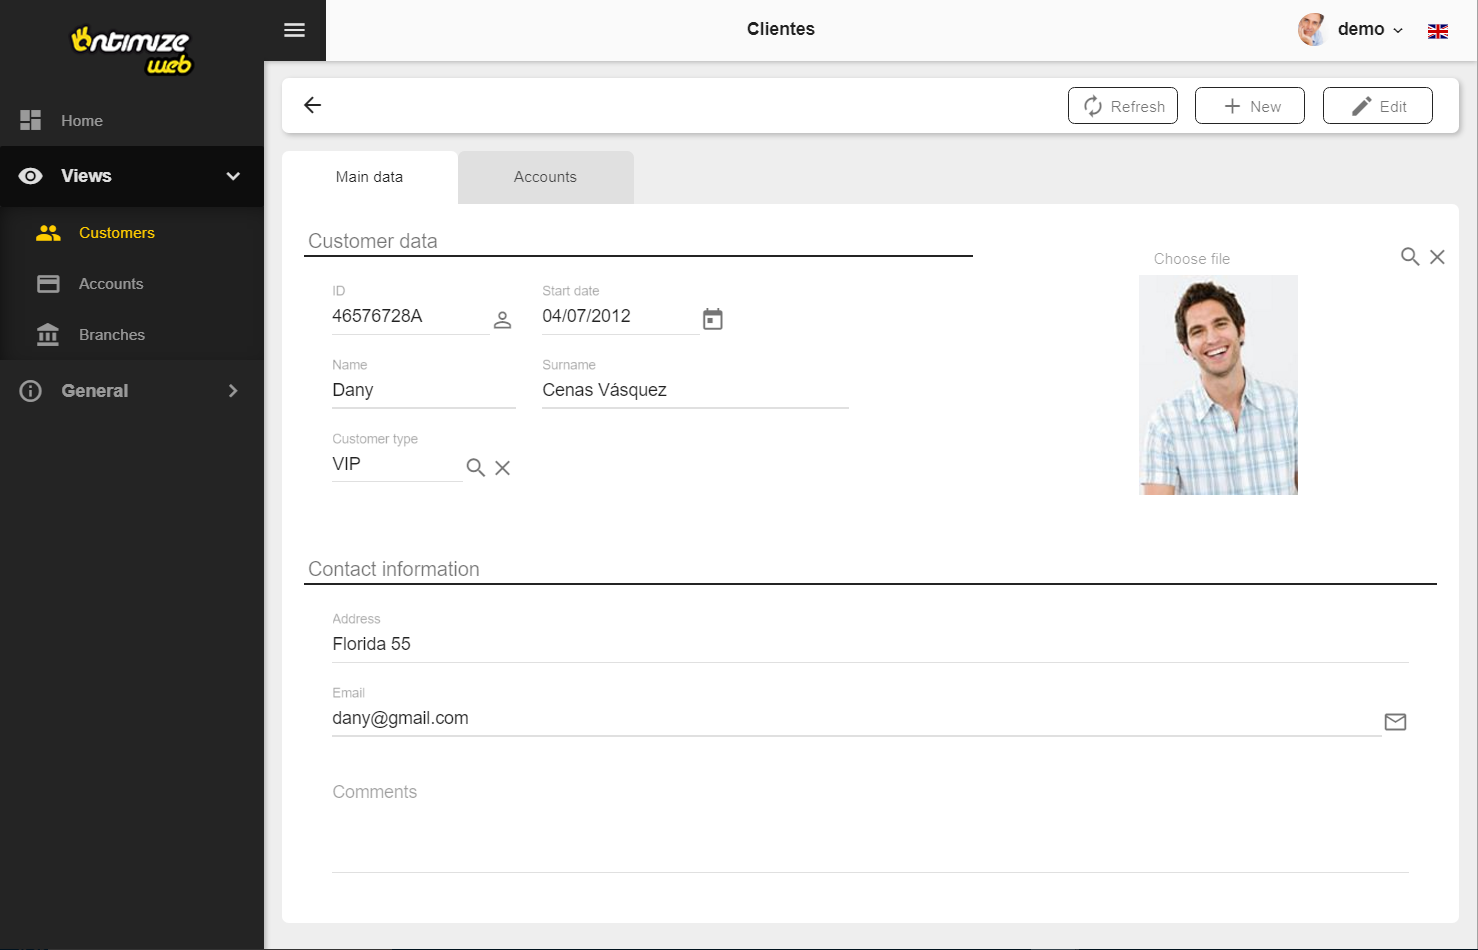
For adding the field we have to open the HTML definition file of the form under the location src/app/main/customers/detail/customers-detail.component.html. The content of this file is something like this:
<o-form entity="ECustomers" keys="CUSTOMERID" fxLayout="column" show-header="yes" header-actions="R;I;U" #oForm>

  <md-tab-group fxFill>

    <md-tab label="DATA">
      <div fxLayout="column" layout-padding>
        <o-row attr="row1" layout-align="space-between center">
          <o-column title="CUSTOMER_DATA" layout-align="start stretch" fxFlex="60" layout-padding>
            <div fxLayout="row" fxLayoutAlign="start center">
              <o-nif-input attr="ID" fxFlex="30" class="margin-right-24"></o-nif-input>
              <o-date-input attr="STARTDATE" fxFlex="30"></o-date-input>
            </div>

            <div fxLayout="row" fxLayoutAlign="start center">
              <o-text-input attr="NAME" fxFlex="30" class="margin-right-24"></o-text-input>
              <o-text-input attr="SURNAME" fxFlex="50"></o-text-input>
            </div>

            <div fxLayout="row" fxLayoutAlign="start center">
              <o-list-picker fxFlex="30" attr="CUSTOMERTYPEID" query-on-init="no" query-on-bind="yes" enabled="yes" filter="yes" value-column="CUSTOMERTYPEID"
                entity="ECustomerTypes" keys="CUSTOMERTYPEID" columns="CUSTOMERTYPEID;DESCRIPTION" visible-columns="DESCRIPTION"
                separator=" - " class="margin-right-24">
              </o-list-picker>
            </div>
          </o-column>

          <o-column fxFlex="40" layout-align="center center">
            <o-image attr="PHOTO" fxFill class="customer-picture" empty-image="./assets/images/no-image.png"></o-image>
          </o-column>
        </o-row>

        <o-column attr="other_data" title="CONTACT_DATA" layout-padding layout-align="start stretch">
          <o-text-input attr="ADDRESS"></o-text-input>
          <o-email-input attr="EMAIL"></o-email-input>
          <o-textarea-input attr="COMMENTS" rows="4"></o-textarea-input>
        </o-column>
      </div>
    </md-tab>

    <md-tab label="ACCOUNTS">
      <div fxLayout="column" layout-padding>
        <o-datatable #accountsTable entity="ECustomerAccountBalance" parent-keys="CUSTOMERID" keys="ACCOUNTID" detail-button-in-row="yes"
          detail-form-route="accounts" edit-button-in-row="yes" edit-form-route="accounts" columns="ACCOUNTID;ENTITYID;OFFICEID;CDID;ANID;ACCOUNT;BALANCE;CUSTOMERID;CUSTOMER;STARTDATE;ENDDATE"
          visible-columns="ACCOUNT;BALANCE;STARTDATE;ENDDATE" title="ACCOUNTS" sort-columns="STARTDATE" select-all-checkbox="no"
          query-on-init="false" query-rows="6" quick-filter="yes" pageable="yes" delete-button="false" insert-button="no">

          <o-datatable-button (onClick)="onAddAccount()" label="ADD_ACCOUNT" icon="add"></o-datatable-button>

          <o-datatable-column attr="ACCOUNT" title="ACCOUNT" class="o-datatable-column-centered"></o-datatable-column>
          <o-datatable-column attr="STARTDATE" title="STARTDATE" type="date" format="LL"></o-datatable-column>
          <o-datatable-column attr="BALANCE" title="BALANCE" type="currency" currency-symbol="€" currency-symbol-position="right" thousand-separator="."
            decimal-separator=",">
          </o-datatable-column>
          <o-datatable-column attr="ENDDATE" title="ENDDATE" type="date" format="LL"></o-datatable-column>
        </o-datatable>

        <o-list-picker class="display-none" (onChange)="onNewAccountSelected($event)" #accountListPicker query-on-init="no" automatic-binding="no"
          query-on-bind="no" [static-data]="availableAccountsToAdd" required="no" enabled="yes" filter="yes" keys="ACCOUNTID"
          value-column="ACCOUNTID" columns="ACCOUNTID;ENTITYID;OFFICEID;CDID;ANID;BALANCE;ACCOUNTTYP" visible-columns="ACCOUNT;BALANCE"
          separator=" - " dialog-width="600px">
        </o-list-picker>
      </div>
    </md-tab>
  </md-tab-group>
</o-form>
Analyzing the code, we can see a o-form that contains several fields that take value from the entity ECustomers specified. The parameter attr of each field corresponds with an attribute (field name) that exists into the response of the service of the entity ECustomers.
We will add our date field after the customer type field with attr='CUSTOMERTYPEID'. So, we add the code below:
<o-text-input attr="PHONE" fxFlex="30"></o-text-input>
The text input field corresponds to o-text-input, the rest of div’s and o-row are simply used to place the field according to the others. We set the attr='PHONE' because we know that the entity contains this attribute which corresponds with customer phone number.
If you reload the page on the browser you will see the phone field placed to the right of ‘Customer type’ field.
You can find all available fields and all of their configuration parameters into the Components section.
Listen to an event
The next change that we will perform will be to listen to the value change event of a form field. In this case we choose a date field (STARTDATE) which value change event will be triggered every time the user changes its value.
Just a little clarification before continuing: the fields are only modifiable when the form is in ‘edit’ or ‘insert’ mode. So, taking that in consideration, we have to use the form defined in the file src/app/main/customers/edit/customers-edit.component.html. The content of this file will be like this:
<o-form entity="ECustomers" keys="CUSTOMERID"
  fxLayout="column" show-header="yes" label-header="CUSTOMERS" header-actions="R;U;D" #oForm>

  <div fxLayout="column" layout-padding class="rounded-panel">
    <o-row attr="row1" layout-align="start stretch">
      <o-column title="CUSTOMER_DATA" layout-align="start stretch" fxFlex="60" layout-padding>
        <div fxLayout="row" fxLayoutAlign="start center">
          <o-nif-input attr="ID" fxFlex="30" class="margin-right-24" required="yes"></o-nif-input>
          <o-date-input attr="STARTDATE" fxFlex="30" required="yes" (onChange)="onDateChange($event)"></o-date-input>
        </div>

        <div fxLayout="row" fxLayoutAlign="start center">
          <o-text-input attr="NAME" fxFlex="30" class="margin-right-24" required="yes"></o-text-input>
          <o-text-input attr="SURNAME" fxFlex="50" required="yes"></o-text-input>
        </div>

        <div fxLayout="row" fxLayoutAlign="start center">
          <o-list-picker fxFlex="30" attr="CUSTOMERTYPEID" query-on-init="no" query-on-bind="yes" required="yes" enabled="yes" filter="yes"
            value-column="CUSTOMERTYPEID" entity="ECustomerTypes" keys="CUSTOMERTYPEID" columns="CUSTOMERTYPEID;DESCRIPTION"
            visible-columns="DESCRIPTION" separator=" - " class="margin-right-24"></o-list-picker>
        </div>
      </o-column>

      <o-column fxFlex="40" layout-align="center center">
        <o-image attr="PHOTO" fxFill class="customer-picture" empty-image="./assets/images/no-image.png"></o-image>
      </o-column>
    </o-row>

    <o-column attr="other_data" title="CONTACT_DATA" layout-padding fxLayoutAlign="start stretch">
      <o-text-input attr="ADDRESS"></o-text-input>
      <o-email-input attr="EMAIL"></o-email-input>
      <o-textarea-input attr="COMMENTS" rows="4"></o-textarea-input>
    </o-column>
  </div>

</o-form>
We also need to modify the file customers-edit.component.ts to include the callback for the event:
import { Component } from '@angular/core';

@Component({
  selector: 'customers-edit',
  styleUrls: ['./customers-edit.component.scss'],
  templateUrl: './customers-edit.component.html'
})
export class CustomersEditComponent {

  onDateChange(evt: number) {
    /*
      do whatever you want
    */
  }

}
Open a form
The last test we will do is navigate to another screen of the application. To do that, we are going to add a button to our screen and when we click on it, we navigate to the other screen.
Continuing with the example, we will place the code of our button in the file customers-edit.component.html.
<o-button type="RAISED" label="Navigate to 'About'" (click)="onButtonClick()"></o-button>
And we will modify the file customers-edit.component.ts like this:
import { Component, ViewEncapsulation } from '@angular/core';
import { DialogService } from 'ontimize-web-ngx';
import { Router } from '@angular/router';

@Component({
  selector: 'customers-edit',
  styleUrls: ['./customers-edit.component.scss'],
  templateUrl: './customers-edit.component.html',
  encapsulation: ViewEncapsulation.None
})
export class CustomersEditComponent {

  constructor(
    protected dialogService: DialogService,
    protected router: Router) {
  }

  onButtonClick() {
    this.router.navigate(['about']);
  }

  onDateChange(evt: number) {
    /*
      do whatever you want
    */
  }

}
Analyzing the code we have to pay attention in a few things:
- We use the Router component for navigating, so we need to import it and reference it in the constructor of our CustomersEditComponent.
- We add the callback function onButtonClick that will be executed when user clicks on button.
As we can see, in the callback function we call navigate method of router to navigate to other screen of our application. It is important to take into account that “about” route was previously defined as a route of our application. For further information about routing check this link.
That’s all, you do not need anything else. When user clicks the button it will navigate to the ‘About’ page.